
I’ve never been a Mac fan, but I do have to say that our family does have several Apple products in our home, 2 iPads and an iPhone… for the kids and my wife. Whether I like to admit it or not they do make a highly polished quality product.
It had been an interest of mine recently to run Mac OS X on my powerhouse PC at home, but I wanted it to run as virtual machine. I raked over some sites that stated it was not possible, I found that rather funny I mean how is it not possible doesn’t Mac run on Intel hardware nowadays anyhow? Then I stumbled on this video.
It does a good job at showing the basic steps, however it doesn’t explain much along the way, I figured it would be good to break this down and explain it.
- Download this file (approx. 6 GB), within this file is a file called Yosemite 10.10 Retail VMware.rar, this needs to be extracted to a location of your choice, preferably onto a SSD. This rar file contains VMware prepped OS X files (vmx, vmdk) for use with VMware products.
- Install VMware Workstation or VMware Player, I chose the Workstation route since I already had it installed.
- Confirm VMware Workstation or VMware Player is installed correctly, and close the program.
- Download the latest OS X Unlocker, at the time of writing it is version 2.0.8.
- Extract the contents of OS X Unlocker onto your computer. OS X Unlocker essentially patches the installed VMware product so Mac OS X can be installed. It does this modifying some core VMware system files.
- Browse to the folder where you extracted OS X Unlocker and Run the following files As Administrator (win-install.cmd and win-update-tools.cmd)

Note: if something goes wrong or you’d like to restore the original files for your VMware application you can run win-uninstall.cmd. - Run VMware Workstation or VMware Player and select Open a Virtual Machine.

- Select the Mac OS X 10.9.vmx file and select Open.

- Go to Edit virtual machine settings. Either by right clicking on the Mac OS X 10.9 object on the left side panel or via the tabbed window.
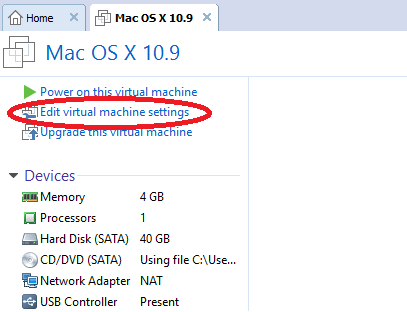
- You can keep the default resources if you prefer or bump them up, I personally bumped them up to 8 GB and 2 vCPU. The important option here is Version which is on the Options tab. This needs to be set to Mac OS X 10.7. This option is not available by default, the OS X Unlocker we ran earlier has exposed this option. If for some reason you don’t see this option, look at re-running the OS X Unlocker steps, it needs to be Run as Administrator.

- Now power on the Virtual Machine using Power on this virtual machine or by right clicking and going to Power > Start Up Guest.
- The machine will boot up and take you through the OS X setup process, it’s very quick and painless. Once complete it’s now time to install the latest VMware Tools onto the newly created OS X VM. You may have picked up on it when we ran win-update-tools.cmd for OS X Unlocker… it pulled down the latest and greatest for us to mount and install.
- Right click on the Mac OS X 10.9 VM on the left side and go to Settings.
- Go to CD/DVD and go to Browse and mount the darwin.iso file. Make sure Connected is checked!


- The VMware Tools installer should pop right up, just click Install VMware Tools and then reboot upon completion.

- If you want to take it a step further to improve the VM performance there is tool called BeamOff which is included in this file we downloaded in step 1. This tool disables beam synchronization which in turn improves OS X VM performance.
- Mount the Beamoff Tool.iso similarly to VMware Tools in the step previous. Alternately you can download BeamOff zip and do this yourself if you prefer.
- Extract the BeamOff application to somewhere on your VM.
- Go to System Preferences.
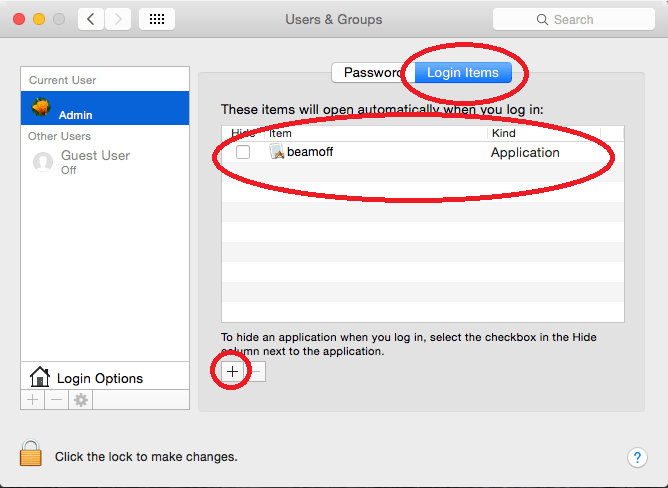
- Go to Users & Groups.

- Click on your User account and select Login Items, click the + and browse and select beamoff.
- At the time of this writing OS X El Capitan is now available, if you want to apply it, go fetch the update from the App Store and install it!

Hopefully you found this informative, I found it interesting and thought I should share my experience.

why unlocker 2.0.8. does not download completely? I had 100 attempts of download directly from http://www.insanelymac.com/forum/files/download/339-unlocker/
I have signed on this forum, but download maximum 7mb, but full a size is 9,6 Mb. May be you have an idea what is wrong/
Generally with any Forum you need an account to download their content.
I would suggest signing up to the insanelymac forum.
I love you!
I’m not a fan of Apple myself. I actually had Macs and stopped using them years ago.
But I needed to open and edit some audio projects in a specific application (Mac only). Work stuff.
It worked like a charm.
Thank you!!
Ha ha, You’re welcome.
Winrar repeatedly says the darwin.rar file is damaged and cannot be opened
Try 7-Zip.
I followed the process but when I boot the VM, I get stuck at the apple logo. How long should the OS take to load on first run?
i too have the same
I also get this, and a popup says “The CPU has been disabled by the guest operating system.” How can this be fixed?
Oops! I was using a PC with an AMD processor. When I used a PC with an Intel processor, used the max recommended memory and selected OSX 7 (not 9), it worked!
Thanks a ton for this. The only thing that is quite annoying is the stuttering. It’s very laggy, though I have a quite powerful system, so it’s pretty hard to edit videos, for instance. Any idea on how to counter this?
There may be some way to optimize it, how much cpu/memory did you provide the VM?
I tried to install Sierra and I keep getting the “CPU disabled by Guest OS” error. Do you know of any fix for this? thanks
Are you using an AMD processor? That was my problem. When I switched to a PC with an Intel processor, used max recommended memory, the software versions in the zip file, and specified 10.7 (not 10.9) OS, it worked.
Where does the .vmx file go? I can’t find it.
The .vmx file is part of the RAR file that you download in Step 1. Once you extract the contents of this archive you will have the .vmx file.
Don’t suppose you know if running this VM works with multiple displays do you? Cheers!
I have not tried using multiple displays, you will have to try this out and let us know! According to the VMware Workstation documentation there is multiple display support for one VM, however it does not list Mac OSX as being a supported Operating System.
smokin!.. thank you!
You’re welcome!
Trying to get this going for a chance to play around a bit. Thanks for setting it up.
I think I’ve gone through your steps carefully, but when I try to run the virtual machine I get this error.
“Mac OS X is not supported with binary translation. To run Mac OS X you need a host on which VMware Player supports Intel VT-x or AMD-V.”
I’m running Windows 10 (64-bit)
Intel i7 2.4 GHz
12 GB Ram
Any help would be appreciated.
My guess is VT-x, Virtualization Extensions is disabled on your computer. Have you run Virtual Machines on this PC before? If not there is a good chance VT-x is just disabled in your BIOS, have a look there and enable it if necessary.
Great job explaining it with the pics, instructions and links! Worked great on my Dell XPS 15.
Glad to hear it worked for you, happy to share my experiences!
Hey, thank you again for this post. Well written, detailed and understandable.
Question. I am trying to run this on a SurfaceBook with VMPlayer7. The resolution of the Mac makes the desktop window tiny. I tried changing the resolution from “host” to monitor 1 with 1920×1080 with similar outcomes. Any tips?
I am not overly familiar with the SurfaceBook but I notice the native resolution is 3000 x 2000, is this correct? I suspect this is the issue and why it’s displaying like this. When you go to the Apple menu > System Preferences > Displays is 1920×1080 the only res that shows up?
Yes. It is the only resolution which shows up. But its okay. It was a matter of testing really. I will make the effort for the hackintosh. Thanks again.
I haven’t tested this within VMPlayer7, but within VMware Workstation with the VM powered off, edit the Virtual Machine Settings and click on Display. By default it is set to Use host setting for monitors, select the Specify monitor settings and select the right resolution for your setup (3000 x 2000).
Is there any way to change the resolution of the MacOS VM window? I tried to set it in the VMWare display settings but it doesnt take. The only option within Mac’s preference is 1024×768. Would love to be able to bump up to a larger workable window size.
Also…thank you for the wonderful guide, i’ve been looking for something like this for years.
Thanks for the kind words, I did some testing for you and the following works for me in terms of changing the resolution.
From within VMware Workstation with the VM powered off, edit the Virtual Machine Settings and click on Display. By default it is set to Use host setting for monitors, select the Specify monitor settings and select the right resolution for your setup. Power on the VM and it should be adjusted to whatever you have selected.
Unfortunately, i’ve tried that and still do not have the option. I can confirm on 2 completely different computers that im getting the same experience.
Hey thanks for the guide, this is great! I just wanted to clarify one of your steps to make sure I’ll be following this correctly:
In step 14, you say “Make sure Connected is checked off!” but in the image it shows Connected with a check mark inside… So does Connected need to be checked, or not? Your original language makes it seem like “Connected” should not be selected but I’m not sure.
Thanks and thanks again!
Sorry it should say “Checked”, thanks for pointing this out I’ve updated the post.
Thank you for this guide! Worked sweet. One question though. How can I use my camera in Macos?
These instructions assume you are using VMware Workstation.
Make sure the camera is detected within your Windows Operating System, once confirmed start up the VM. Once booted, from the menu bar select VM > Removable Devices > “Camera Device Name Here” > Connect (Disconnected from Host). You may receive a warning, accept it to grant the VM exclusive access/control to the device. Confirm connectivity in OS X via System Information.
Can i not run this on a AMD FX-8350? Keeps coming with CPU disabled. Any help appreciated
Also in the BIOS the says the Virtualization thing is enabled but speccy says Virtualization Supported, Disabled.. Thanks
I couldn’t get it to run on my AMD laptop. It runs on my Intel laptop.
Guess its Intel only then. Thanks for reply
I cannot get the camera to work, the green indicator comes on, when I open face time and photo boot, but no video. And it work with no problem in the host. WIN10. any idea?
This method worked for me and my camera.
These instructions assume you are using VMware Workstation.
Make sure the camera is detected within your Windows Operating System, once confirmed start up the VM. Once booted, from the menu bar select VM > Removable Devices > “Camera Device Name Here” > Connect (Disconnected from Host). You may receive a warning, accept it to grant the VM exclusive access/control to the device. Confirm connectivity in OS X via System Information.
thanks and I saw your earlier post, but the camera is not recognized in the MAC OS. So this is not working for me
I’m running and Samsung Notebook Spin Pro with intel core i7 and 8gb of ram but it gets stuck at the apple logo for “El Capitan”, any help would be greatly appreciated.
Hi, have you tried running xcode in this as well as the simulator? sorry had to ask first before going to download a huge file.
I was also wondering if the latest Xcode will run with this setup? I need to have the newest Xcode up and running for a college class that requires the use of a macbook or something similar. I would like to use my PC to run this VM stuff and I’ve heard even though it is a pain to setup it is possible. I await your reply. Thanks
Unfortunately I can’t give you this answer since I have not tried, but I don’t see why this wouldn’t work.
They keep installing xcode updates on my Mac VM, so I would say yes. I use it to create a Xamarin app for iPad
Can I switch from OSX and Windows 10 whenever?
Since we are using virtualization, you can switch back and forth between OSX and your desktop O/S, I assume this was your question.
I don’t like that you can only run this on an Intel processor. My laptop runs on an AMD processor and I don’t currently have enough money to buy a laptop with an Intel processor let alone dealing with buying an actual Mac! Is there any way I can get this to work on AMD??? If there is that would be amazing!
followed steps to the letter but when i go to open a virtual machine the macosx10.9.vmx is nowhere to be found?????
you should extract also the rar “Yosemite 10.10 Retail VMware.rar”, the vmx file is there.
Thanks! Up and running now. One more thing. Can’t seem to mount “BeamOff”. Not sure I’m fully understanding the instructions. Tried downloading, extracting, etc., but not sure where to find it to mount?
Same situation here as the comment about the missing file. I get to Step 8 and browse to find the MAC OS X 10.9 inside the Yosemite folder and it’s not there. What did I do wrong?
you should extract also the rar “Yosemite 10.10 Retail VMware.rar”, the vmx file is there.
These instructions and the supplied files worked flawlessly as of 2/12/2017. Was not expecting it to be so painless. From one stranger on the internet to another, thanks so much for your help!
Same Chris – this installation was very well said and spelled out – one of the only things that wasn’t directly said was that you had to put the unlocker next to the folder of the VM iso! Great tutorial for someone who stayed up till 6am trying to get a single mac program to work on windows!
What exactly do you mean by putting the unlocker next to the folder? I think that may be why I can’t get this thing to run. I’m not getting an option to change my version number in VMWare Workstation and I’ve ran both .cmd’s as admin. I have Workstation 11.0.0 and unlocker 208. Should I upgrade to a newer version of Workstation?
Also, Here’s a screenshot of the greyed out section: https://i.imgur.com/o0k2NIT.png
amazing your tutorial and files is the only one I found so far on the web that actualy worked and got the mac up and running on my Acer AXC-603 with 8 gigs ram d intel i2900 processor.
Only question is the step to instal darwin supposed to be before you start p the virtual os as we need to make the changes on the ledt panel and nce the os is up and running not sure how to get to it without stopping the os.
Either way reat job and kudos to you.
Got the darwin mounted but vmware tools is not popping up. WHat am I doing wrong ? It doesay the darwin.iso is connected
never mind it worked after restarting lol. Thanks again for this. Only issue is every time I try and install an app I get the error we could not complete your request as ibooks author can’t be installed on Yosemite retail gamereviews vmware because os X version 10.11 or later is required. But I upgraded to the latest ios
quick q lewis – how did you mount the darwin? I exited the guest os and accessed the screen he showed and followed the steps, but not my guest OS freezes everytime I try and log in. Thanks in advance!
I’m getting stuck on the version changing part. I’ve used the unlocker and ran both the .cmd’s as admin but when I open the .vmx in VMWare Workstation the version number is greyed out for me and I can’t change it. What am I doing wrong?
Here’s a screenshot of it: https://i.imgur.com/o0k2NIT.png
I am running this on a surface book and have everything running but the surface Book’s front camera. I do not see it as an option when I go to the VM menu for removing or adding device. The camera does work in Windows and the driver is fine. How can I add the camera to VMware workstation 12 and then to the OSX virtualization?
Are there any limitation to using mac OS with VMware on a PC or a laptop like the Zenbook? Is it prone to bugs, lag, slow? Can you update the operating system as soon as apple releases updates without issues? Any problems with downloading, using apps, restoring old purchases? How about syncing all your devices via iCloud, like notes, calendars, safari tabs with all your devices etc? Any other issues I didn’t mention or does it just work perfectly? Thank you!
I just installed it on my Surface Book. I can’t get the integrated Surface Book camera to work. Other then that everything else works. Just to note, for iMessages and Facetime to work, you need to follow the instructions in this YouTube video https://www.youtube.com/watch?v=XBa89FEDJbg
Good luck.
Just managed to install this, a big thank you to whoever wrote this 🙂
Thank you for sharing the amazing technics! This works with the latest version too!
I have a question, does it work fine with the latest Mac OS Sierra? I updated to it in a different virtual software I was using until a few months ago, but it did not work with the improved screen. It was disabled to make full screen again so I ended up uninstalling that one and now I am currently using this one.
Thank you for this informative and accurate walkthrough.
Thank you sir!
Thanks so much for this great walkthrough. I tried installing VMWare tools, but it just said that the installer wasn’t set up right. The VM works fine without it, just a bit slow. Is it okay if I don’t install VMWare tools? And if not, how can I fix the problem?
Thanks!
Same situation here, would be interested in knowing how to resolve this issue.
I had the same problem.
I couldn’t get it to install using unlocker208. But there was a unlocker203.rar included in the large file in step 1. I mounted that .iso instead and it installed without any problems.
Performance seems much better after install.
Hope this helps.
Thanks!
Sir, I did upto 12th step in VMware player. Its worked fine upto that. After the MAC Os installation, it showing as “Setting Up Your MAC” for long time with color circle cursor rounding in the screen. And didnt get any status update. what should I do now? Kindly help me to continue and complete the installation.
Thanks a lot for this guide! I was able to get it running for the most part, I had to use the trial option on my workstation because the patch apparently didn’t work for the keycode, but it did allow me to select the OS x 10.7. So I can power on the guest, log in and when it auto runs the vmware tools it tells me “You cannot install VM Ware Tools in this location. The VMware Tools installer does not allow its software to be installed here.” However, I was able to get Beamoff to work successfully. My shot in the dark guess would be it’s something to do with the “win-update-tools” part not working right? Any help would be great. I’d like VM Ware to not stop working for me after 30 days haha
I just encountered this problem too, so you are not alone.
I’ll let you know if I find any fix for this as I continue to root around (and kindly feel free to do the same haha).
I had the same problem.
I couldn’t get it to install using unlocker208. But there was a unlocker203.rar included in the large file in step 1. I mounted that .iso instead and it installed without any problems.
Performance seems much better after install.
Hope this helps.
That solved the issue I was having! Thanks!
When I powered on my virtual machine this message came up “The configuration file “C:\Users\fizzy\Documents\Virtual Machines\Mac OS X\Mac OS X.vmx” was created by a VMware product that is incompatible with this version of VMware Player and cannot be used.
Cannot open the configuration file C:\Users\fizzy\Documents\Virtual Machines\Mac OS X\Mac OS X.vmx.” I do not understand as I made sure that everything was compatible, I used VMware Player and I don’t know if this made a difference, I really need help. Thanks
Works Perfectly! I appreciate the effort you put into this post and building the RAR. Thank you for taking this time to put this together! Now I can publish an App to the App store and do not need a real MAC. I did not want one anyway, just to publish. Apple in there wisdom strong arming people to by a MAC.
Do you need the darwin.iso ? I started the VM without it and it works.
I went to install Darwin. In the MAC VM is says “You cannot install VM Tools in this location”
same happened to me. is there any workaround to this?
This is an awesome guide!
Only one small hiccup, I couldn’t get VMWare Tool to install using unlocker208. But there was a unlocker203.rar included. I mounted that .iso instead and it installed without any issue.
I’d like to thank you for the work you have put into this, it really made this into a simple task.
Thanks!
I have a problem. When I try to run the virtual machine I get this error message:
Error while powering on: VMware Player cannot connect to the virtual machine. Make sure you have rights to run the program, access all directories the program uses, and access all directories for temporary files.
The VMware Authorization Service is not running.
Please help. Thanks in advance.
No actually the error message is:
Mac OS X is not supported with binary translation. To run Mac OS X you need a host on which VMware Player supports Intel VT-x or AMD-V.
(sorry I don’t know how to edit)
I tried installing https://downloadcenter.intel.com/download/7838 as it says on https://kb.vmware.com/selfservice/microsites/search.do?language=en_US&cmd=displayKC&externalId=1003945 but it didn’t help.
Unfortunately the vm won’t get past halfway through the boot up in vmware workstation. I have tried to install the included Player software and it won’t install because I already have workstation. I’m assuming this problem is a version issue 😦
Hi,
I got to the stage where I need to install the VMware Tools. But it gives me an error on the second option. Not able to install in this location. I can’t even select any of the three options.
Please advise
A
Managed to complete all the steps but I cannot download XCode from the AppStore since it says it needs an updated version of the OS.
So I updated to El Capitan. The update finished succesfully but it somehow still run Yosemite version. Why is that?
And of course because of this I am unable to install XCode from the AppStore.