 in 2012 Honda Civic (9th Generation)")
Recently there’s been a lot of buzz around Dash Cameras with many “interesting” videos popping up all over YouTube. As a techie it’s always cool to fiddle around with new stuff and I wanted to put such a camera into my daily commuter, a 2012 Honda Civic Sedan.
I wasn’t dying to get a dash cam, but it’s one of those techie things that if it falls in my wheel house I’m going to do it no matter what. And so, I was shopping on Amazon last week and I somehow came across a cheap covert dash cam for $79.99 CDN, and it had good reviews, so I thought hmm at this price it’s worth a shot. At higher price points I was much more reluctant to pull the trigger but this definitely seemed like a good value buy.
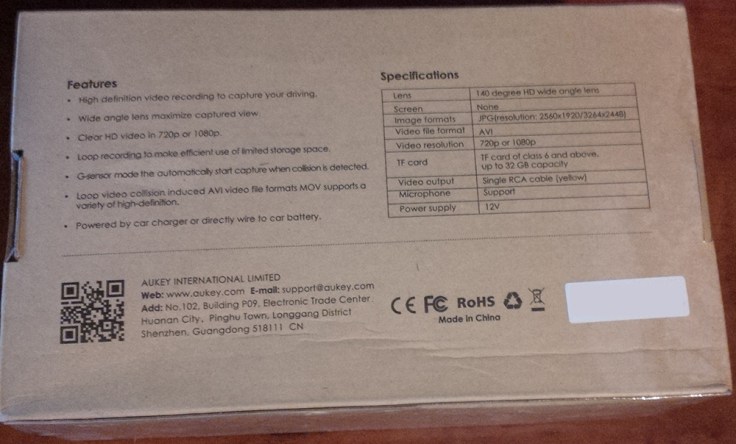
The camera I stumbled upon is an Aukey DR-H1, it’s a small well-built little camera. The camera supports up to 32 GB of micro SD storage and records at 1080p. It doesn’t have any fancy bells and whistles like some other cameras do (gps, etc) but I wasn’t going to use those anyways. To be honest I just wanted something that was a “set it and forget it” type of product, just for piece of mind. So let’s get to my install.
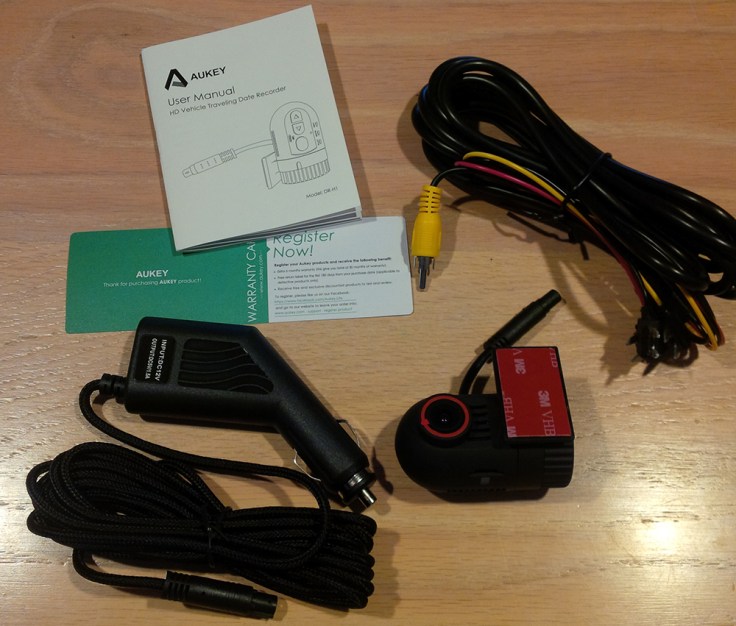
What’s in the box?
- Dash Cam
- Fuse Box Wiring Power Cable (with video out – which is used to customize settings)
- Cigarette Lighter/12 Volt Accessory Power Cable
- Manual + Registration Card (extends warranty by 6 months to 30 months warranty)

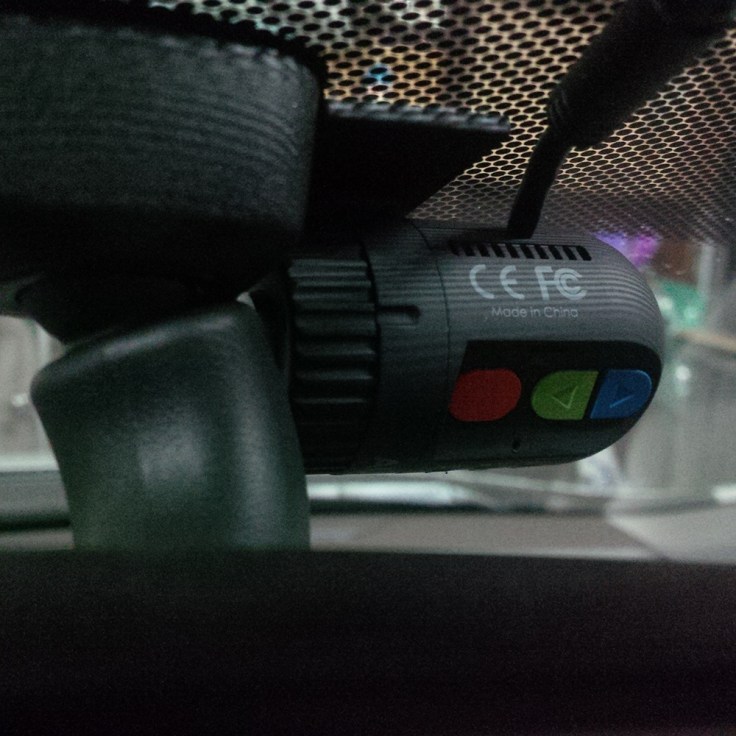
Camera Closeup
It’s very small and covert when installed, seems solid with great build quality. As you can see it uses the 3M double-sided tape, so once you stick it, it should hold solidly.


Initial Testing:
I wanted to go the fuse box route for installation, it’s much cleaner and routing the cable in the civic took minimal time, maybe 10 minutes max. In my opinion, the manual provided did not give great directions for installing the camera into the fuse box. As a first time dash cam installer I thought the camera could just operate on acc power (ignition 12 v), I didn’t understand why the camera needed constant 12v and acc (ignition) 12v so before installing the camera in the car I did some testing externally to better understand.
My testing came to the conclusion that the acc ignition power wire was basically a normally open switch, but when energized, it closed and the camera powered on. It made sense after playing with this, because if the camera were to work just off acc power it would never shut down cleanly unless it had some internal circuitry/battery. What I mean is when the car is turned off, the power to the camera would be cut immediately and the camera would not have had a chance to shut down gracefully. Through testing it was easy to see this, when the car was turned off the camera continued to run for about 3 seconds afterwards.
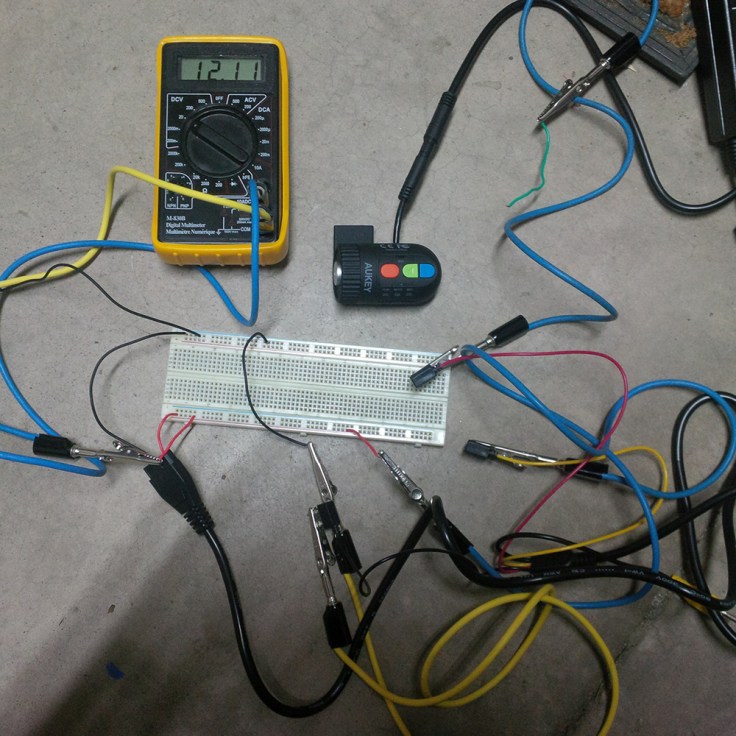 Constant voltage applied, note dash cam is powered off.
Acc voltage applied, note dash cam is now powered on.
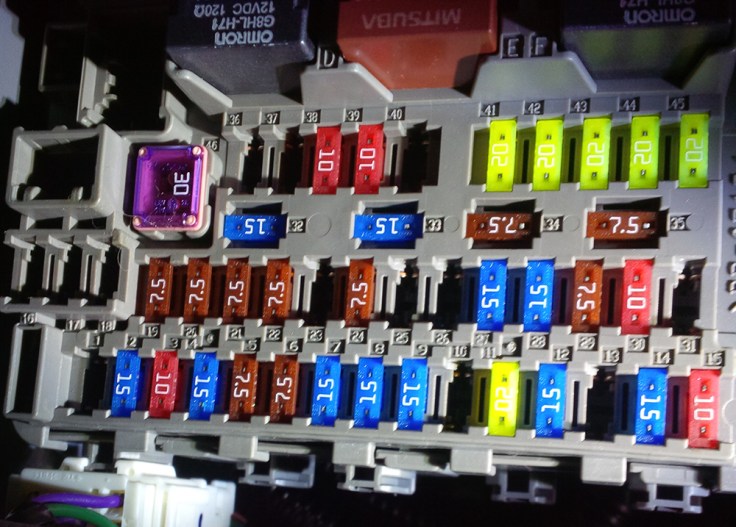
Fuse Box in Civic:
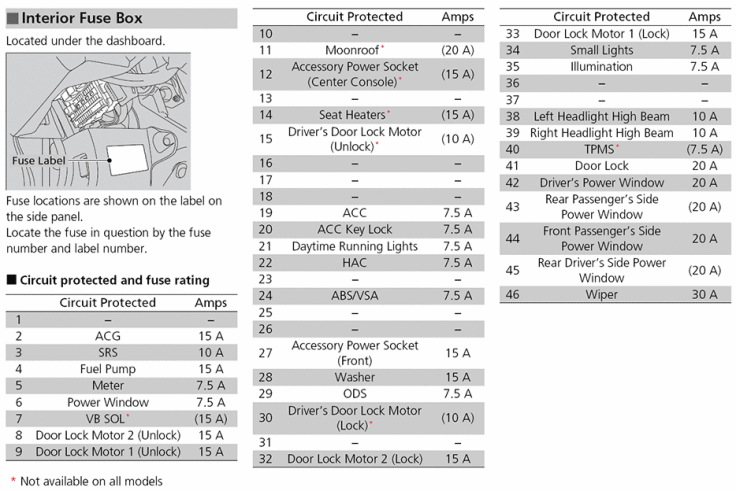
First order of business was to find constant 12v power and acc 12v power… so I pulled out the multi meter and found fuse location 10 (constant) and 23 (acc). There are obviously more possible locations and the ability to tap other spots as well but these worked for me.
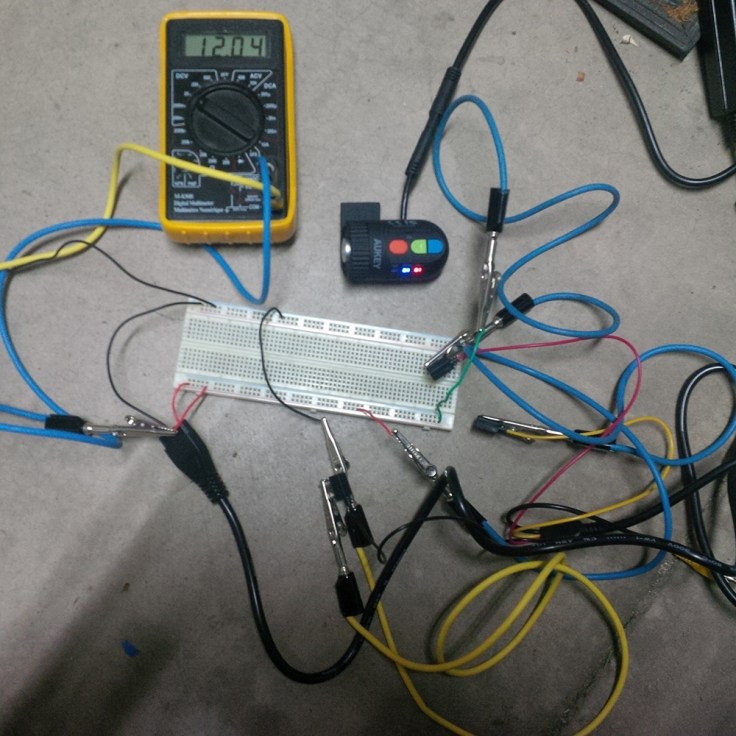
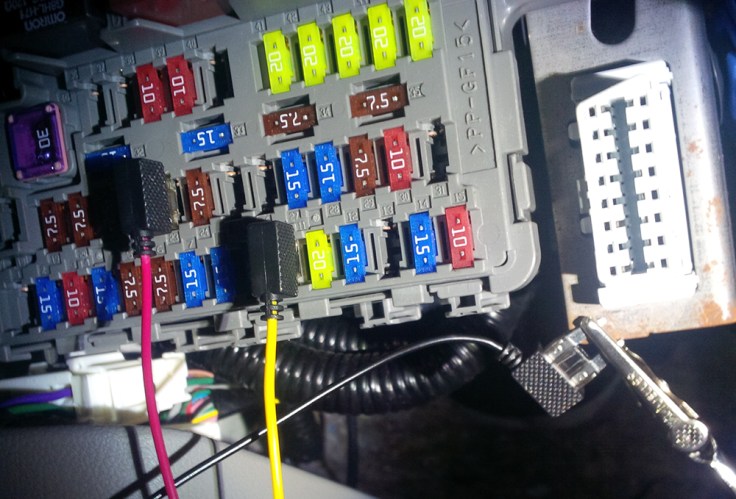 Here’s the successful test configuration with the supplied wiring.
Prepare Ground Wire and Locate Grounding Location
The only modification I had to make to the supplied wiring was to turn the black (ground) wire into a usable ground wire for installation. The process is quite simple, it just requires cutting the end of the cable and crimping on a more appropriate end.


There are certainly many spots to ground this off, I picked a location that I thought was suitable for this application.


Install the Dash Cam and Run the Wire
Now that we have everything ready to go, find a spot to stick the dash cam. The most common spot is right behind the rear view mirror so it does not obstruct your vision in any way. I chose to go right behind the mirror just on the right hand side.
Run the wire… it seems daunting but really it’s rather simple as you will find out. I’ve marked the pictures in red to illustrate where the wire is running.


Wire it up
As described early, this is wired to a 9th generation Honda Civic (model year 2012). Yellow wire (constant 12v) fuse 10, red wire (acc) fuse 23, black wire (ground).

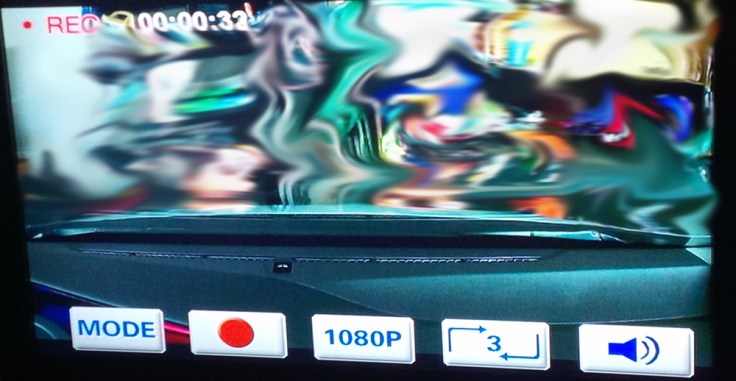
Configure Settings
Plug the yellow rca/composite wire into some kind of display. I didn’t have a free TV kicking around so I ended up having to make a custom rca cable with some left over cables I had lying around. I ran it to my TV inside and used Facetime to program it… funny I know but it worked well and rather quickly. This allowed me to configure a few settings, the most important being date/time. 2 other settings of value are the 720p/1080p and the 1, 3, or 5 minute length setting.
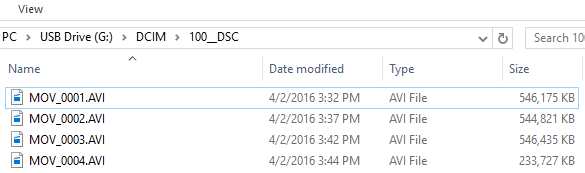
File Size and Recording Capacity
I set my camera to use the 5 minute video length setting. I did some rough calculations and it appears that the camera can record a maximum of approximately 300 minutes of footage at 1080p. The camera is geared to roll over on it’s own, so it’s maintenance free.
Final Thoughts
All in all it was fun little project, it didn’t break the bank and it was a good learning experience. Overall the camera is not too bad, at night it’s not the greatest but as I always say you get what you pay for.
I’ve taken some video and I have posted it up, enjoy and as a side note I’m sorry about the slightly distorted sound during the night-time clip, my music was a tad too loud.

Thanks for this install guide. I just picked up a version of this dash cam and was wondering about why the ground was a fuse type connector.
I’m curious, these fuse connectors don’t seem to support an inline fuse like some of the others you get from the auto parts store. I think it might be smart to swap it out to prevent damage should there be an issue that causes a circuit to overload (something like this: http://amzn.com/B013JU4K76).
No problem, glad it was of use for you.
As for your comment about add a fuse, it’s a very legitimate concern. I was looking at adding one but the stores wanted 25 dollars for it (I live in Canada). The camera only cost me 80 dollars so I could not personally justify it at the time. I’m sure I probably could’ve sourced it online for cheaper but it would have been a waiting game at that point.
As of this comment I’ve had no issues thus far and I’ve actually used some footage from the cam, so far so good.
i try your method and did not work at all in usa for the same car you have all of the blank banks (unused) in the fuse box should have the connections so you can install a fuse if you add a extra item when bought this car.
My car is the Canadian model, surprised to hear this – sorry it didn’t work for you. In your case what did you end up doing?
Ive successfully installed it in my vehicle and I tried connecting to the Av1 connection on a monitor. The menu pops up just like your screen shot but I can’t seem to understand how to maneuver through the modes, arrows, etc etc. I see that I can change the selection form 1-5 but then what – what corresponds to what? I just really want to change he date and select the 1080dp which I have. Any help would be appreciated. Detailed step by step would be great …
Please see my reply below in regards to the same issue.
I have successfully installed this dash cam as well and use an aux port in a monitor already in the vehicle. Works great….Except I have not been able to locate the date and time screen….so can someone give me a step by step helping hand to this screen…….Thanks in advance….
Almost Forgot …. I have looked for information all over the net for days about this dash cam……and want to let you know that this installation write up is the best by far that I have seen….Nice work!!!
Thanks for the nice comments! Unfortunately I can’t remember exactly where the time setting was in the menus since I installed this a while ago now. I do recall it wasn’t very difficult to set, I am rather surprised this has now happened to 2 people in the comments section. Is there potential for some kind of defective unit?
It’s a pain to hook up the RCA cable for me since I don’t have a spare TV lying around, I will see if I can get around to doing this and report back with results.
I got it to work just fine…A lot of back and forth trial and error….and disregarding the instructions…..Trouble is I did not make a record of what worked…but after Christmas, I will do it again and record the steps and then post here….Be patient, I’ll be back….
Here’s what I did to get to the screen to change the date and time. I hope it works for you too.
Start your vehicle. If your hardwired connections are correct, the dashcam will start upon vehicle start and the dashcam will be recording. See REC at the top left of your monitor screen.
Place the dashcam into standby…by clicking the silver button on the end of the dash cam. Labeled as #7, Record Pause button in the instructions. Now see STBY on the top left of the monitor screen. This is Standby mode.
To enter the screen that allows you to set the time and date, press and hold the ORANGE button until you see the screen to set the date and time. When the screen appears, release the orange button.
Use the silver button on the end of the dash cam to navigate from box to box and use the green button to lower the number and the blue button to increse the number in a given box.
When finished on this screen, navigate to the Return icon below the date and time area, click the silver button and you will be at the standby screen, then click the silver button again and you will be at the recording screen.
Any Questions, please let me know….Thanks and Good Luck.
Thanks ponder for taking the time to post this, much appreciated! This will definitely help anyone else who is having trouble with setting the date/time.
Honda Civic 2012
Installing Z-Edge Z3 Dash Cam
Couple of questions.
1. Did you need to remove any panels to run the wire as you illustrated? I’m comncerned about messing with the panels that have the curtain airbags. Did you use any tools to help you with run?
2. I’m considering installing a Z-Edge Z3 Dash cam and purchasing this 12v to 5v wiring harness on Amazon. Since I don’t have the video out requirement would I just plug the red wire into port 23 (acc) on the fuse box and ground the wire as you did?
In your case it appears that you just need ACC power and ground (since you only have 2 wires (hot and ground). You can either determine a suitable location in the fuse box yourself (power that turns on and off with the car) or use location 23 as I have. Somebody previously commented above that their civic was not the same as mine (Canada vs US model?) so you may have to do some testing.
As for running the wire, I just used my fingers and went slowly, no tools were used and nothing was pulled off.
Hope this helps and good luck.
Awesome! Thanks for the tips and quick response. Really appreciate the post.
Does anyone know how to reset the language on this cam. I used reset, because of a different problem, and it has reverted to Chinese.