
This information can both apply to home and business users. I want to create detailed instructions so that the most basic of users can create and deploy the image. For home users you can create a recovery image in case something goes wrong with your PC. For business users this can speed up deployment time to multiple PC on your network. Either way you can have your desktop recovered in a matter of minutes with a full suite of software, updates, and preferences. You can design the image to be very broad covering a wide range of hardware or very specific and target a specific set of hardware. The choice is yours. Specific set of hardware would be more geared for the home user. I will cover Windows 7 deployment. From here on in all references made to windows assume we are talking about windows 7.

The following software and hardware is necessary to create a custom image. A Windows machine with 100GB of free space, a 4GB flash drive, Windows OS disc, Windows AIK, Oracle VM VirtualBox, DISM GUI, Virtual Clone Drive, latest driver pack from DriverPack.net, hardware drivers for your specific hardware, and another flash drive or usb hard drive size will depend on your image size. You could use CDs or DVDs for booting the software but as of Windows 7 I find that flash drives are more reliable than optical media and less prone to installation errors. Having said this you will need to create a CD or DVD WinPE image so you can image the Virtual Box Operating System, as Virtual Box does not allow booting from flash drive. But we’ll get to that later.
The windows machine will be used to create the initial image for the deployment and install the supporting applications like AIK, VirtualBox, DISM GUI, Clone Drive, and slip stream all the necessary drivers for your hardware. The driver pack will be used for the WinPE image that will be created with Windows AIK. This will ensure that WinPE is compatible with most hardware out there. WinPE is used to image the actual hardware and stands for Windows Preinstallation Environment, it is small and used as a forefront for deploying the wim images. We will be creating a x86 version of WinPE as I found that the x64 version has problems with detecting some of the hardware, this also means that when downloading the mass storage drivers and network drivers from DirverPack.net download the x86 versions. Your actual OS image architecture will depend on your installation disc for your hardware.
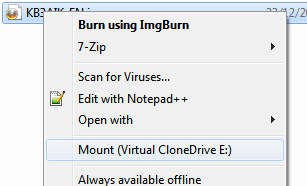
Windows AIK is a 1.7GB download so get ready for a long wait if your internet connection is a little slower. Once you have everything downloaded you can proceed and install Virtual Clone Drive (VCD). VCD is used to mount iso files, it creates a virtual CD/DVD drive and allows you to install the iso without having to burn in onto a CD/DVD. Mount the Windows AIK to VCD, it’s easy right click the iso and select Mount (Virtual CloneDrive …). In my case VCD assigned itself to drive letter E.
Open up the drive and run StartCD.exe (if autorun doesn’t kick in), then proceed with the Windows AIK Setup. Agree to the license terms, select your installation location, and let it install. It is recommended to have an up to date .NET framework installed. Once AIK install you can unmount the image. Start the Windows AIK Deployment Tools Command Prompt as Administrator.
WinPE Creation
Here we’ll begin to create the WinPE disc for image capture and creation. More info on creating the WinPE environment. In the command prompt type in the following command:
copype.cmd x86 c:\winpe
Where x86 is the architecture of WinPE and c:\winpe is the detination where it will be copied to. Then you run a command to copy and rename the winpe.wim file.
copy c:\winpe\winpe.wim c:\winpe\ISO\sources\boot.wim
Then you need to add imagex.exe to the WinPE image, this executable is responsible for capturing and deploying wim windows images.
copy “C:\Program Files\Windows AIK\Tools\x86\imagex.exe” c:\weinpe\ISO\
Note the quotes around the source path. These are necessary due to the space in the directory structure. Next you will need to create a bootable flash drive. Open up a new command window as administrator.

In the new command window open up Disk Partition manager by typing…
diskpart
Insert your flash drive in to a USB port. In the next few steps we will format the flash drive and make it bootable. Then copy the contents of WinPE to the flash drive.

list disk
This command lists all the disks attached to the computer.
select disk 6
This selects the 6th disk which in this case is the flash drive
create partition primary or create part primary
Creates a primary partion.
select partition 1 or select part 1
Selects the partition you just created.
active
This marks the partition with focus as active. This informs the basic input/output system (BIOS) or Extensible Firmware Interface (EFI) that the partition or volume is a valid system partition or system volume.
format quick fs=fat32
Quick formats the flash drive partion as fat32 file system.
assign letter= f
This command is not really necessary and you can skip it, but you’ll need to unplug and plug the flash drive back into the computer. Alternatively you can use it to assign a drive letter to the flash drive so it appears in Windows.
exit
Exits the disk partition manager. You can also use the above steps to create bootable flash drives in Windows at any point and time.
Before we copy the contents of the WinPE iso directory to the flash drive we need to slip stream the mass storage and network drivers in to the WinPE wim. Remember to pick the appropriate architecture and operating system driver pack from DriverPacks.net. The file we need to tackle is located in C:\winpe\ISO\sources it is the boot.wim file we copied earlier. Create a temporary (C:\Temp) directory. We will mount the wim file with DISM GUI there, the application mounts the contents to a directory where you can make changes and then later commit them to the wim image file. Without DISM GUI we would be doing this via command line, you can thank Mike Celone for this neat little app. One thing to note about Driver Packs, they can only be downloaded via Bit Torrent, you can use the Opera browser if you would like as it has a built in Bit Torrent client.
Launch the application with elevated permissions, as administrator. Choose the wim file located in the sources folder, and select the mount location. Once you selected the file and mount location click Mount WIM. DISM is Running… may take a few minutes it all depends on the size of the wim file. DISM Output should come back wiht “The operation completed successfully.”

Click the “Driver Management” tab. Make sure the Force Unsigned and Recursive options are checked. Then proceed to click Add Drivers. DISM is Running. Please wait.. again depending on how many drivers there are this might take a few minutes, be patient. If you have specific hardware drivers you want to use add them here as well. Remember we’re using x86 version of WinPE so you will need to use the 32 bit drivers.

Once this is done click on the “Mount Control” tab and click Dismount WIM. It will ask you if you want to commit chages, click Yes. Again we play the waiting game as DISM GUI does it’s thing. Once complete you can close DISM GUI, now we need to copy the contents of the ISO folder to the flash drive. Go back to the command line window either will do. And type in the following.
xcopy C:\winpe\iso\*.* /e F:\
Where f: is the drive letter of the flash drive. Once this process completes we’re done creating the universal WinPE image. You can eject and pull the flash drive from the computer and test it by booting it in another computer. If you followed the instructions you should be good to go. While we’re here we should probably also make an iso image of the WinPE boot disk, this will be later used to capture and deploy the Windows OS image in Virtual Box. A Virtual Box instance can not be booted from a flash drive, so the iso will need to be burned to a CD or mounted in VCD and then booted in the VM. I prefer the latter. In order to create the iso in the Deployment Tools Command Prompt type in the following.
oscdimg -n -bC:\winpe\Etfsboot.com C:\winpe\ISO C:\winpe\winpe.iso

Oscdimg is a command-line tool for creating an image file (.iso) of a customized 32-bit or 64-bit version of Windows PE. -n option enables long file names, and the -b option specifies the location of the El Torito boot sector file. Do not use any spaces. CD-ROMs usually have their own structure of boot sectors, for IBM PC compatible systems this is subject to El Torito specifications. Here is the oscdimg Technet article if you’d like more info in it.
Windows OS image creation
Install Virtual Box on your computer. Create a Windows 7 32bit or 64bit VM, depending on your media and your OS architecture.

Go to New, type in a name for your Virtual Machine or VM, click Next. Allocate memory to the VM, you want minimum of 512MB. I would recommend at least 2GB or 2048MB, but this all depends on the capability and resources of your host machine. My desktop has 16GB of RAM so freeing up 2GB for the VM is a non issue. But it’s all hardware dependant. I’d say if you have at least 4GB or RAM give the VM 2 of that. If you this, do not run too many applications on your host machine while running the VM. Click Next after you allocated RAM to the VM. Select Create a virtual hard drive now, click Create. For Hard drive file type, I selected VMDK. The reason I selected this is because this is the same extension as used by VM Ware, so potentially I could copy this machine to a VM server if I wanted to. Click Next after you selected the Hard Drive file type, select Dynamically allocated and click Next. If you select Fixed Size it take a while to create the Virtual Disk, this is why I selected Dynamic.For File location and size, I selected the default of 25GB, to save your VDMK in a specific location click the folder icon on the right. Click Create.

Your VM is now created, all you need to do now is install the Operating System.
Insert the Operating System disc into your CD rom drive or mount the iso in CloneDrive. To select the Virtual CloneDrive(VCD) highlight the VM in Virtual Box and click settings, Storage, and add an IDE controller, click Leave Empty. Highlight the Empty controller, and under the Attributes click the disc icon and select the drive letter that corresponds to the Virtual Disc. In my case it’s E.

Click OK. and Start the VM. Click the VM window and start pressing F12 so you can choose the device from which to boot from. Select c for CD-ROM. Boot into the installation menu and start installing Windows in your VM. Install the operating system, all the windows updates and any other applications you would like this image to have. When creating a user during this installation, create a generic user such as User, Admin, or PC. Once you sysprep the OS you will not be able to create that specific User ID again. So if in the final deployed image you want to a User ID named Admin do not use that during the initial VM OS installation.
As a system admin I install all my software over the network using PDQ Deploy, and use Group Policy to push any other mandatory software, drive mappings, pirnters, etc. So installing software on the OS would be more geared towards a home user, or a small business. I mostly use the image to deploy windows with current updates and such.
Either way this Windows installation, and updates will probably take a while.
Once you see the above and you’ve installed all the applications you desire it’s time to take a snapshot of your image. The snapshot allows you to revert the VM to a previous state. We want to do this right before running sysprep, as sysprep can only be run a limited amount of times on an operating system. To do this, in your Oracle VM VirtualBox Manager on the top right click Snapshots, this will open the snapshots pane, then click the camera button and it will take a snapshot of the operating system state. I do several snapshots just in case I screw something up during installation. I take one right after the Windws updates, a bare OS install, and one prior to running sysprep with all the custom software installed. To restore a snapshot the VM needs to be shut down.

A restore is handy when you want to go back and update your image. Every quarter (3 months) I go back to the image and add new updates and software revisions if necessary. This is part of my Disaster Recovery plan. This prevents me from running the lengthy process of Windows updates each time, and with multiple snapshots, I have varying restore points.
The next step is to run sysprep. Sysprep is a system preperation tool which strips the operating system of hardware specific drivers preventing compatibility issues when installing the OS on different hardware. If you’ve ever setup a desktop computer from Dell this is almost exactly what it does. Don’t worry after we create the image we will slip stream the appropriate hardware drivers into it with DISM GUI. Sysprep is located in C:\Windows\System32\sysprep\sysprep.exe. Double click on the executable file. Select Enter System Out-of-Box Experience (OOBE), check Generalize, and select Shutdown.
Click OK, this will run a cleanup and generalize phase and then shutdown your VM.
Capturing the Windows Image
Once the VM is shut down mount the winpe.iso we created earlier in Virtual CloneDrive. Also make sure that the VCD is available to the Virtual Machine, you can double check by highlighting the VM, clicking Settings and selecting Storage. Under Controller: IDE you should see Host Drive ‘E:’, where E: should reflect the drive letter corresponding to your computers VCD drive letter.
Now this is important, next you want to boot that VM you just sysprepped and shutdown. However you want to boot it to the mounted WinPE iso, CD-Rom in the VM. One thing to consider is that you will need to save the Windows image somewhere, and it can not be in the VM, so you have options you can either save it to your host machine bu mounting a shared folder in the VM in WinPE via the net use command, or attach a usb drive to the VM via Settings, USB, and clicking the add USB Device icon.
Start and focus on the VM window, keep pressing F12 while booting to bring up the boot menu. Select option c0 which is cd-rom to boot the mounted WinPE image. 
The above image is an indication that WinPE is loading. Once booted you’ll be greeted with a dos command prompt window, generally X:\windows\system32>. Next you’ll need to figure out which drive is where and what drive letters are assigned to them. Usually I just go through the alphabet with the command a:, b:, c:…. etc. In my instance the USB did not come up in the VM, typical, it rarely works. So we have to do this the hard way, mount a network drive in WinPE(VM) and send the image to the Host PC. This is why we slip streamed LAN and Storage drivers into the WinPE image earlier. I had 3 drives I found c:, d:, e:, and x:. C is system reserved, D is the Sysprepped OS, E is the WinPE cd-rom, and X: is the drive assigned to the current WinPE instance. Note these drives and what is on them.
First let’s make sure the VM has an IP, run the command ipconfig to confirm that it does. If you get a IPv4 address that doesn’t start with 0.x.x.x or 169.x.x.x you’re good to go. If you don’t get an IP you need to find the right LAN drivers and slip stream them into the WinPE wim, and recreate the iso. 
Next ping your host computer IP make sure the VM can talk to the computer it is running on. Run ipconfig on your host computer to get it’s IP address and then ping that ip from your VM, for example my host pc IP was 10.50.70.104, so in the VM i ran the command
ping 10.50.70.104
and the pings were succesful. This means the two machines can talk to each other. 
Next create a folder called IMAGE on the VM host machine in the root of c:, C:\IMAGE. Right click the folder, select properties, select the Sharing tab, and click Share. In the File Sharing window you will need type in Everyone and click Add or press enter. Under Permission Level give Everyone Read/Write permissions and click Share. If you are not able to share the folder you will need to enable File and Printer sharing in windows go here to see how it’s done. Remember, sharing is caring.
Now we will mount this shared folder in the VM that is running WinPE using the net use command. Context is as follows ‘net use <drive letter> \\server\share’, in my case I used the command
net use z: \\10.50.70.104\image
With this command I mounted the shared folder image on machine with IP 10.50.70.104, to a Z drive in WinPE. In my case I was also prompted for a user name and password, the reason for this is because I’m on a domain, and my domain security settings require a valid domain user. The user id was preceeded by the domain, domain\userid, and a second prompt prompted me for a password.
Time to capture the Windows image. If you’re not already switch to the X drive by typing in x:. I used the following command to capture the windows image
e:\imagex.exe /capture d:\ z:\laptopIMG.wim “Laptop Image”
This will start the image capture process.
e:\imagex.exe is the location of the imagex program on the cd rom. This program is used for capturing and deploying images.
/capture a command line switch that tells imagex to capture an image.
d:\ this is the swtich for the source of the image. The drive which had the sysprepped windows 7 OS.
z:\laptopIMG.wim switch for the destination and name of the image file. Z: network drive we mounted earlier which points to the VM host machine.
“Laptop Image” a label switch given to the image file that will be created.
That’s pretty much most of the hard work. You’re almost done. All that is left is to wait for the image to finish being captured. Once the image is captured open up up DISM GUI and mount the wim file, same as before, this time we will add the hardware specific drivers though, LAN, Sound, Mouse, Keyboard, Chipset… etc. Grab the hardware drivers from the manufacturers website. Use the instructions above. If you have various hardware setups on your network or at home grab all the drivers necessary and slip stream them all into the wim file. One thing to note is that slip streaming Video drivers will not work. I’m ok with that as they change so often it is a non issue with me. You could always place an executable in a folder of the Windows 7 image. Unmount and commit the Windows image changes in DISM GUI. Your image is complete, all that is left to do is deploy it to a machine.
Windows Image deployment
To deploy the image plug in the WinPE flash drive and the USB drive that has the windows wim file on it, into a computer. Change the boot priority on the PC so it boots from the WinPE flash drive. Once in WinPE you need to locate all the drives and distinguish them, write down which is which. Then we need to enter disk partiton manager again, we will erase the primary drive in the machine, and leave the flash drive and USB drive alone. Enter the following commands in the command prompt:
diskpart – enters partition manager
list disk – lists all the disks connected to the machine
select disk 0 – selects the primary disk
clean – wipes the information on the disk
create partition primary size=300 – creates a partition size of 300MB
select partition 1 – selects the partition you just created
format quick fs=ntfs label=”System” – quick format an NTFS drive with label “System”
assign letter=S – assign drive letter S to the System partition that was just formatted
active – sets the partition as a valid system partition
create partition primary – creates another primary partition on the drive
select partition 2 – selects the 2nd partiton
format quick fs=ntfs label=”Windows” – quick formats the 2nd partiton with NTFS file systerm and the Windows label
assign letter=C – assigns drive letter C to the 2nd partion
exit – exits the diskpart utility
Now let’s image the freshly formatted drive with your Windows image. Assuming that the WinPE flash drive is on drive F: and the USB drive with the Windows image on drive G:, run the following command.
f:\imagex.exe /apply g:\laptopIMG.wim 1 C:
f:\imagex.exe – is the image management application located on the WinPE flash drive
/apply – is the switch to tell the application to apply a wim image
g:\laptopIMG.wim – is the location of the image file in the USB drive
1 – is the index of the wim, a wim can house different version of itself
C: – is the destination that the image is to be applied to
Update: Forgot to mention an important step in deploying the image. Prior to restarting the computer after imaging, the bcd boot command needs to be ran. BCDboot is used to initialize the Boot Configuration Data (BCD) store and copy boot environment files to the system partition. For example, at a command prompt, type the following.
C:\windows\system32\bcdboot C:\windows (for a x86 OS)
C:\windows\SysWOW64\bcdboot C:\windows (for a x64 OS)For the 64 bit version of bcdboot the command has to be run from the SysWOW64 directory otherwise it will not work.
Wait for it to finish, power down the computer, and remove the flash and USB drive. Then boot up the computer and go through the setup process such as creating a User, setting the time zone, adding to the domain… etc.
Enjoy.
Happy Christmas and a Merry New Year.

Thank you for this. I’ll check this out later.. Having to use acronis right now but will take a more advanced look into this.
You’re most welcome. Also don’t forget the BCDboot command, forgot to post it initially but I’ve added to the post since.
Good write-up on this process. I wanted to comment, though, about your statement, “Once you sysprep the OS you will not be able to create that specific User ID again.” I had the same problem with sysprep. I learned about the “audit” mode of sysprep that allows you to delete the initial generic user, though. You can run SysPrep to reboot in audit mode, remove temporary users as default Administrator, and re-run SysPrep for OOBE.
To be honest for me it doesn’t matter as I later remove these accounts with Group Policy, once the computer is added to the Active Directory. Also via active directory I create a new local admin account on all computers for which I rotate a password every thirty days.
to be able to use the same name every time i usually go into the C:\users and also HKEY_LOCAL_MACHINE\SOFTWARE\Microsoft\Windows NT\CurrentVersion\ProfileList and delete the previous user as well as removing them from CONTROL PANEL \ USER ACCOUNTS before Sysprepping. Some of that might be overkill of course as Sysprep might do some of that anyway.
It was not a huge deal at my work since we only use that non standard name when booting the PC up the very first time. But in our documentation we spell out what username to use and after updating the image the first time we ran into that issue where it rejected the username. Then updating the image again caused it to reject both names so doing the above seemed to solve it. Now we use the same name when coming out of OOBE, immediately create/activate the default administrator account once we are logged in, reboot and log in as administrator, delete the above key and folder and remove the old name from Manage User Accounts. That way our closet of imaged PCs can all be logged into with the same account info. Very minor issue but I didn’t want to update the documentation and choose a new name every time we updated the image. That would have confused the user and if they forgot to create the administrator account led to a closet full of imaged PCs with varying user accounts. Not a big deal if it was documented but sometimes it wasn’t ha ha. At least we can be consistent.
I should also add this only affected the PCs waiting to be deployed. We don’t join them to the domain until they are handed out so this issue only bothered the IT person when they went to grab and configure one.
Good catch, thanks for the info.
Trying to follow your directions and got stopped at the driver pack. I’m doing this for Windows 8.1, do they not make a driver pack for that? Or can I get by without that driver pack?
The mass storage and network drivers are only used for WinPE, you shouldn’t use them for the OS.
The Windows 7 drivers should work on PE no problem.
If that is not the case then you’ll have to use the storage drivers and network drivers that came with your hardware, and add them to PE.
My advice to you would be to use a USB flash drive for WinPE.
Excellent write up.
I’m confused. Will this allow me to move my current Windows installation into Virtualbox? I am wanting to do it so that I can run my Windows from within Ubuntu.
If it does this, would you mind please updating it… and hopefully recording a Youtube tutorial? Thanks so much. 😀
No it will not. For that I suggest you use disk2vhd or a similar program.