
WSUS or Windows Server Update Services is used on a local network to approve or reject Windows updates and security fixes. The benefits of this system of delivering updates is that it allows you as much or as little control over updates as you want. It’s all about choice. So if you do not want the Windows 10 OS update rolling out to your Windows 7 desktops, you have the ability to prevent that.
For Server 2012 R2 it’s quite easy to install WSUS. Start up the Server Manager, click Add roles and features, and under Server Roles and Windows Server Update Services select WID Database and WSUS Services. Install the WSUS server role.

Once installed,start up WSUS and you should be greeted by the WSUS Server Configuration Wizard. If that is not the case you can start it manually from the WSUS Options.
There are a few things you should note before you start.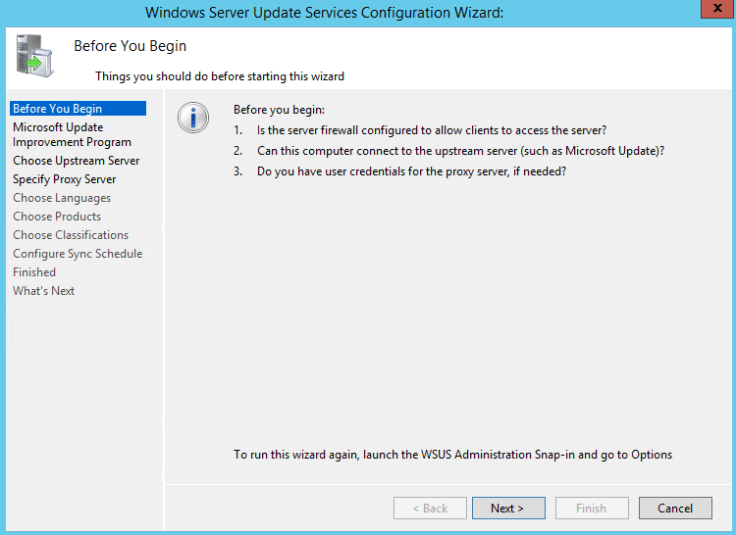
Join the improvement program if you wish. I generally opt out.
Choose the upstream server. If this is your only WSUS server on the network you will synchronize your updates from Microsoft. Otherwise you can opt for another WSUS server on your network.
Set a proxy server if you need to.
Then you will connect to the upstream server by clicking Start Connecting button. This process can take a while and it can actually fail on your first try. Be patient, grab a coffee or something.
Choose the language that you want all your updates in.
Choose which OS or Microsoft Software you want to receive updates for.
Pick which types of updates you want. Generally I pick critical, definition, and security updates.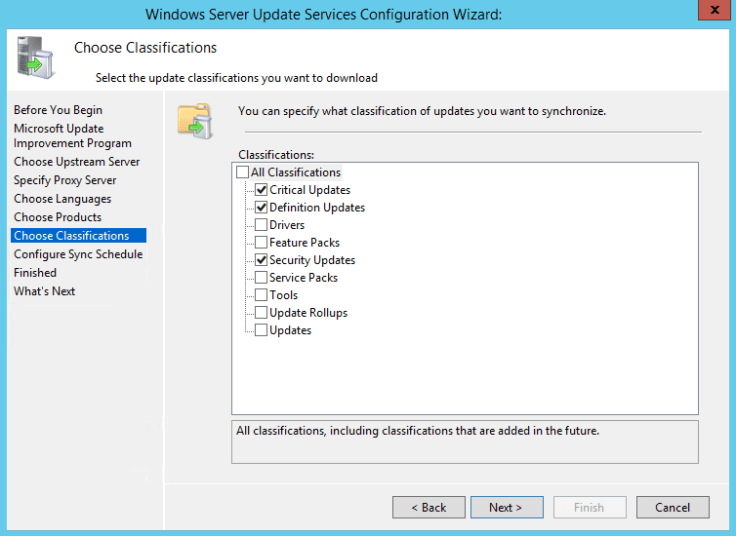
Configure the Sync Schedule. This sets the time at which WSUS checks for new updates and pulls them down from Microsoft. I generally set this for after business hours.
You can now start the initial sync of Windows Updates for the products you selected, go ahead and grab a long lunch, this can take a while.
Now you can set a couple of other options in the WSUS application. I like to set the Automatic Approvals. This way I’m not approving hundreds of updates every week. I set the Critical and Security updates for WIndows 7 desktops to automatically approve. You can also set it up for a specific group of computers. You can set this group up either manually or via Group Policy. I will cover the group policy method later in the post.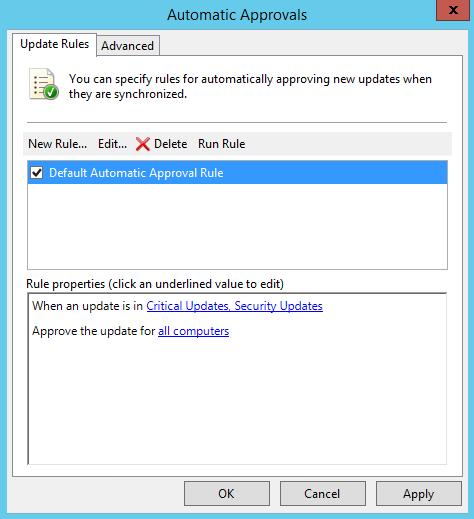
Next go to Computers in WSUS options and select Use Group Policy or registry settings on computers. This option allows you to use group policy to set the computer group membership. This is the preferred method. Close it, the next time the sync runs it should pull all the updates down. Please note that generally during initial setup, when I ran the manual sync it would more often than not fail. I had to wait for WSUS to pull the updates automatically on it’s scheduled evening run.
Now you will have to create two Group Policy Objects. One of the GPOs will be used to set the local update server and other Windows Update options. The other GPO will be used to log users off prior to the updates being applied on the computers. The reason I do this is that the computer will not restart after the updates are pushed if there are any users logged into the computer. The restart is a necessary part of the update.
Here are the things you want to consider when creating these GPOs; when will you be applying these updates, what time of day, which day of the week? These are all questions you should be asking yourself. For instance on my network I schedule my updates for every Wednesday at 10 PM or 22:00. On that same Wednesday evening at 9:30 PM all users are logged off every machine on the network. You don’t want to interfere with your employees but you also don’t want the computer to break from a bad patch or update on a Friday morning. You want to avoid spending the entire Friday and parts of the weekend fixing broken software.
Let’s create the Windows Update policy first:
Open up the Policy Manager either on the server or via Remote Administration Tools.
Create a new policy and name it something like WSUS_Desktops. This will be the desktop update policy and will reside in the OU where all the Network computers are.
Link the new policy to the appropriate OU, it is a good practice to test a policy prior to rolling it out, so maybe first link the GPU to a test OU, or set Item Level Targeting for the time being. This is how I do it on my network.
In the New GPO navigate to Computer Configuration, Policies, Administrative Templates, Windows Components, and Windows Update.
Open up Windows Update to view the policies in there.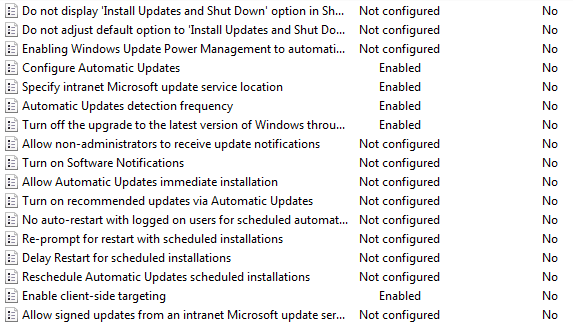
I only care about 5 of those policies. You can get away with using as few as 2 to push Windows Updates via WSUS using a GPO.
Configure Automatic Updates, this policy setting sets up how the updates are downloaded and how they are scheduled to install. I use option 4 – Auto download and schedule the install. I schedule the install time for every Wednesday at 22:00 or 10pm. Enable it and set the options accordingly for your environment.
Specify intranet Microsoft update service location, this policy setting points the computers to the server where you installed the WSUS application. Please input the http address of the WSUS server and port, for example http://server-name:8530. You don’t need to use a FQDN. If you need to find the port number for your WSUS instance remote into the server where WSUS resides, open IIS Manager, and select Sites, in the right pane you will see all the running websites and which port they are on.
Enable the policy and input the address in the two fields under the options pane, same address for both the intranet update service and the statistics server.
Automatic Updates detection frequency, this sets the interval at which the desktop computers check back with the WSUS server to see if there are any new windows updates. Default is 22 hours, this setting is optional.
Turn off the upgrade to the latest version of Windows through Windows Update, this will prevent the dreaded Windows 10 update from appearing on your Windows desktop. This is optional but a wise choice if you choose to enable it.
Enable client-side targeting, this policy setting has only one purpose, it is to set the target group in WSUS. Whatever you the group name, this is what the computers that apply this group policy will be sorted under in WSUS. Do not forget to change the Automatic Approvals in WSUS to this group and make sure all the auto approvals are pointing to the right computer group name. The policy will not auto generate the group in WUSUS, you need to manually create it. Once you create it the computers will be auto added to the group.
One thing to consider is that you might want to change the Security Filtering for the GPO. I changed mine to Domain Computers and removed Authenticated Users, since this policy only targets the machines and not the users this made sense. Once the policy is in place for few minutes, you can run the gpupdate command in command line on your test desktop to attempt and update the group policies on said computer.
Then you can check to see which update server the computer is pointing to by running the following command with elevated privileges on the test desktop…
REG QUERY “HKLM\Software\Policies\Microsoft\Windows\WindowsUpdate”
This will show you the WUServer property, which is the Windows Update server address.
If this value or property is not present then then the group policy has not been applied yet, you might need to reboot. Alternatively you can try to manually register the computer with the server using the following command, wuauclt /detectnow.
Once you have that working, now you can create a group policy to log users off before the updates roll out each week. This is necessary as the computers might not reboot if users are still logged on to the desktops during the update process. Users need to log off so that the policy can reboot the PCs and roll out subsequent Windows Updates.
Create a new policy and name it something along the lines of Users Log Off. Link this GPO to the appropriate OU, one where all the network users reside. Again you might want to test the policy first before deploying it to everyone in your Domain. Open the GPO to User Configuration, Preferences, Control Panel Settings, Scheduled Tasks.
Create a new task and call it something along the lines of “Log Off Notify”. This task will notify users 15 minutes prior to logging them off to have them save their work as not to lose it. The task should look similar to the following.


Note the Action for this task is Display a message the message reads “You will be logged off in 15 minutes. Please save and close all your work if you do not wish to lose it.“
In the same Group Policy create another task and call it something along the lines of “Windows Log Off”. This task will log the users off their computers prior to the Windows Updates being applied. It should look like the following.


Note that the Action for this task is Start a program and you are running a force log off command using cmd.exe and switches.
That is it! Run some tests on your test computer to see if the Tasks are being pushed to your workstation. Test the tasks, make sure they work.

I was wondering about your computer, how is it? Can you take a picture of the whole? Hahaha!
Which one, I own several computers, laptops and servers. 🙂
Your gaming rig? The 3 monitor pc? Hehehe, maybe you can take a picture on it with my name as a fan sign hahaha! “Furzi” I really like your rig sir.