This is somewhat an evolution of my previous posts, such as;
Windows 10 (1803 1903) UEFI Autounattend.xml network installation.
In this one however you will customize several aspects of the Operating System. You will also capture the OS using nothing but hyper V. No external drives necessary.
All through out this process it is recommended that you take regular checkpoints just in case you need to revert to a previous state of the OS.

Install Windows ADK
Grab ADK from here: https://docs.microsoft.com/en-us/windows-hardware/get-started/adk-install
Use version 1809, version 1903 is broken an does not allow you to edit unattend.xml files, it throws up errors. Version 1809 works on 1809 and up. Also install the Windows-PE add on for ADK.
Both tools are necessary.
Install Windows 10 in Hyper-V
Create a Gen2 Virtual Machine and install Windows 10 1809+. When installing the OS create an account, we will remove this before we apply the out of box experience. Customize your os with software and install all and any pertaining software you would like.
Customize Start Menu
Customize your Start Menu like so.
Be aware that the first row in the Productivity section on the Start menu is somewhat temperamental.
Even when specifying a customization it may be overwritten by the Operating System.
Your mileage may vary. I suggest creating a custom section and leaving Productivity alone.

Make sure when grouping Icons in the Start menu to give the groups names otherwise the groups will not export.
Once finished open Powershell and run the following command.
Export-StartLayout -Path c:\start.xml
Customize Pinned Task Bar Icons
Open the start.xml file that you created for your custom Start Menu, use something the likes of Notepad++
Inside the top tag <LayoutModificationTemplate add the following
xmlns:taskbar="http://schemas.microsoft.com/Start/2014/TaskbarLayout"
…and in between the </DefaultLayoutOverride> and </LayoutModificationTemplate> tags add the following.
<CustomTaskbarLayoutCollection PinListPlacement="Replace">
    <defaultlayout:TaskbarLayout>
      <taskbar:TaskbarPinList>
        <taskbar:DesktopApp DesktopApplicationLinkPath="%ALLUSERSPROFILE%\Microsoft\Windows\Start Menu\Programs\Firefox.lnk" />
        <taskbar:DesktopApp DesktopApplicationLinkPath="%APPDATA%\Microsoft\Windows\Start Menu\Programs\System Tools\File Explorer.lnk" />
        <taskbar:DesktopApp DesktopApplicationLinkPath="%ALLUSERSPROFILE%\Microsoft\Windows\Start Menu\Programs\Outlook.lnk" />
        <taskbar:DesktopApp DesktopApplicationLinkPath="%ALLUSERSPROFILE%\Microsoft\Windows\Start Menu\Programs\Microsoft Teams.lnk" />
        <taskbar:DesktopApp DesktopApplicationLinkPath="%ALLUSERSPROFILE%\Microsoft\Windows\Start Menu\Programs\Visual Studio Code\Visual Studio Code.lnk" />
        <taskbar:DesktopApp DesktopApplicationLinkPath="%ALLUSERSPROFILE%\Microsoft\Windows\Start Menu\Programs\MobaXterm\MobaXterm.lnk" />
        <taskbar:DesktopApp DesktopApplicationLinkPath="%ALLUSERSPROFILE%\Microsoft\Windows\Start Menu\Programs\Cmder.lnk" />
      </taskbar:TaskbarPinList>
    </defaultlayout:TaskbarLayout>
  </CustomTaskbarLayoutCollection>
The above reflects the custom layout as displayed in the top image.
All *.lnk files should be located in %ALLUSERSPROFILE%\Microsoft\Windows\Start Menu\Programs\ any that are located in %APPDATA%\Microsoft\Windows\Start Menu\Programs\ should be copied in to the ALLUSERSPROFILE folder.
Note the abobe is only true for user installed applications, software deployed with Windows such as powershell, cmd, or any other features can remain in APPDATA.
If you are missing a link create one on the desktop and copy it into ALLUSERSPROFILE location.
Your final XML should look like the following.
<LayoutModificationTemplate xmlns:defaultlayout="http://schemas.microsoft.com/Start/2014/FullDefaultLayout" xmlns:start="http://schemas.microsoft.com/Start/2014/StartLayout" xmlns:taskbar="http://schemas.microsoft.com/Start/2014/TaskbarLayout" Version="1" xmlns="http://schemas.microsoft.com/Start/2014/LayoutModification">
  <LayoutOptions StartTileGroupCellWidth="6" />
  <DefaultLayoutOverride>
    <StartLayoutCollection>
      <defaultlayout:StartLayout GroupCellWidth="6">
        <start:Group Name="Productivity">
          <start:Folder Name="" Size="2x2" Column="2" Row="0">
            <start:DesktopApplicationTile Size="2x2" Column="2" Row="2" DesktopApplicationLinkPath="%ALLUSERSPROFILE%\Microsoft\Windows\Start Menu\Programs\Access.lnk" />
            <start:DesktopApplicationTile Size="2x2" Column="2" Row="0" DesktopApplicationLinkPath="%ALLUSERSPROFILE%\Microsoft\Windows\Start Menu\Programs\Excel.lnk" />
            <start:DesktopApplicationTile Size="2x2" Column="0" Row="2" DesktopApplicationLinkPath="%ALLUSERSPROFILE%\Microsoft\Windows\Start Menu\Programs\OneDrive.lnk" />
            <start:Tile Size="2x2" Column="-1" Row="-1" AppUserModelID="Microsoft.Office.OneNote_8wekyb3d8bbwe!microsoft.onenoteim" />
            <start:DesktopApplicationTile Size="2x2" Column="0" Row="0" DesktopApplicationLinkPath="%ALLUSERSPROFILE%\Microsoft\Windows\Start Menu\Programs\Word.lnk" />
          </start:Folder>
          <start:DesktopApplicationTile Size="2x2" Column="4" Row="2" DesktopApplicationLinkPath="%ALLUSERSPROFILE%\Microsoft\Windows\Start Menu\Programs\Microsoft Edge.lnk" />
          <start:DesktopApplicationTile Size="2x2" Column="0" Row="0" DesktopApplicationLinkPath="%ALLUSERSPROFILE%\Microsoft\Windows\Start Menu\Programs\Outlook.lnk" />
          <start:DesktopApplicationTile Size="2x2" Column="4" Row="0" DesktopApplicationLinkPath="%ALLUSERSPROFILE%\Microsoft\Windows\Start Menu\Programs\Microsoft Teams.lnk" />
          <start:DesktopApplicationTile Size="2x2" Column="0" Row="2" DesktopApplicationLinkPath="%ALLUSERSPROFILE%\Microsoft\Windows\Start Menu\Programs\Vivaldi.lnk" />
          <start:DesktopApplicationTile Size="2x2" Column="2" Row="2" DesktopApplicationLinkPath="%ALLUSERSPROFILE%\Microsoft\Windows\Start Menu\Programs\Firefox.lnk" />
        </start:Group>
        <start:Group Name="DevOps">
          <start:DesktopApplicationTile Size="1x1" Column="2" Row="1" DesktopApplicationLinkPath="%ALLUSERSPROFILE%\Microsoft\Windows\Start Menu\Programs\Notepad++.lnk" />
          <start:DesktopApplicationTile Size="2x2" Column="4" Row="0" DesktopApplicationLinkPath="%ALLUSERSPROFILE%\Microsoft\Windows\Start Menu\Programs\MobaXterm\MobaXterm.lnk" />
          <start:DesktopApplicationTile Size="1x1" Column="3" Row="1" DesktopApplicationLinkPath="%ALLUSERSPROFILE%\Microsoft\Windows\Start Menu\Programs\Oracle VM VirtualBox\Oracle VM VirtualBox.lnk" />
          <start:DesktopApplicationTile Size="2x2" Column="2" Row="2" DesktopApplicationLinkPath="%ALLUSERSPROFILE%\Microsoft\Windows\Start Menu\Programs\Cmder.lnk" />
          <start:DesktopApplicationTile Size="1x1" Column="5" Row="3" DesktopApplicationLinkPath="%APPDATA%\Microsoft\Windows\Start Menu\Programs\System Tools\Control Panel.lnk" />
          <start:DesktopApplicationTile Size="2x2" Column="0" Row="4" DesktopApplicationLinkPath="%ALLUSERSPROFILE%\Microsoft\Windows\Start Menu\Programs\OpenVPN\OpenVPN GUI.lnk" />
          <start:DesktopApplicationTile Size="1x1" Column="2" Row="0" DesktopApplicationLinkPath="%APPDATA%\Microsoft\Windows\Start Menu\Programs\Windows PowerShell\Windows PowerShell.lnk" />
          <start:DesktopApplicationTile Size="2x2" Column="0" Row="2" DesktopApplicationLinkPath="%ALLUSERSPROFILE%\Microsoft\Windows\Start Menu\Programs\Sublime Text 3.lnk" />
          <start:DesktopApplicationTile Size="1x1" Column="4" Row="2" DesktopApplicationLinkPath="%ALLUSERSPROFILE%\Microsoft\Windows\Start Menu\Programs\Docker\Docker Quickstart Terminal.lnk" />
          <start:DesktopApplicationTile Size="1x1" Column="5" Row="2" DesktopApplicationLinkPath="%ALLUSERSPROFILE%\Microsoft\Windows\Start Menu\Programs\PuTTY (64-bit)\PuTTY.lnk" />
          <start:DesktopApplicationTile Size="1x1" Column="4" Row="3" DesktopApplicationLinkPath="%ALLUSERSPROFILE%\Microsoft\Windows\Start Menu\Programs\Git\Git CMD.lnk" />
          <start:DesktopApplicationTile Size="1x1" Column="3" Row="0" DesktopApplicationLinkPath="%APPDATA%\Microsoft\Windows\Start Menu\Programs\System Tools\Command Prompt.lnk" />
          <start:DesktopApplicationTile Size="2x2" Column="0" Row="0" DesktopApplicationLinkPath="%ALLUSERSPROFILE%\Microsoft\Windows\Start Menu\Programs\Visual Studio Code\Visual Studio Code.lnk" />
        </start:Group>
      </defaultlayout:StartLayout>
    </StartLayoutCollection>
  </DefaultLayoutOverride>
  <CustomTaskbarLayoutCollection PinListPlacement="Replace">
      <defaultlayout:TaskbarLayout>
        <taskbar:TaskbarPinList>
          <taskbar:DesktopApp DesktopApplicationLinkPath="%ALLUSERSPROFILE%\Microsoft\Windows\Start Menu\Programs\Vivaldi.lnk" />
          <taskbar:DesktopApp DesktopApplicationLinkPath="%ALLUSERSPROFILE%\Microsoft\Windows\Start Menu\Programs\Firefox.lnk" />
          <taskbar:DesktopApp DesktopApplicationLinkPath="%APPDATA%\Microsoft\Windows\Start Menu\Programs\System Tools\File Explorer.lnk" />
          <taskbar:DesktopApp DesktopApplicationLinkPath="%ALLUSERSPROFILE%\Microsoft\Windows\Start Menu\Programs\Outlook.lnk" />
          <taskbar:DesktopApp DesktopApplicationLinkPath="%ALLUSERSPROFILE%\Microsoft\Windows\Start Menu\Programs\Microsoft Teams.lnk" />
          <taskbar:DesktopApp DesktopApplicationLinkPath="%ALLUSERSPROFILE%\Microsoft\Windows\Start Menu\Programs\Visual Studio Code\Visual Studio Code.lnk" />
          <taskbar:DesktopApp DesktopApplicationLinkPath="%ALLUSERSPROFILE%\Microsoft\Windows\Start Menu\Programs\MobaXterm\MobaXterm.lnk" />
          <taskbar:DesktopApp DesktopApplicationLinkPath="%ALLUSERSPROFILE%\Microsoft\Windows\Start Menu\Programs\Cmder.lnk" />
        </taskbar:TaskbarPinList>
      </defaultlayout:TaskbarLayout>
    </CustomTaskbarLayoutCollection>
</LayoutModificationTemplate>
Apply Custom Layout XML
Registry
Make a directory, c:\windows\OEM and copy start.xml in PowerShell
mkdir -P c:\Windows\OEM
cp c:\start.xml C:\Windows\OEM\TaskbarLayoutModification.xml
Add registry entry to the system.
reg add HKLM\SOFTWARE\Microsoft\Windows\CurrentVersion\Explorer\ /v LayoutXMLPath /d C:\Windows\OEM\TaskbarLayoutModification.xml
The registry method will allow you to make changes to the taskbar and start menu, while the Policy method locks this down.
This method also should be performed in Sysprep Audit Mode.
Group Policy
Copy the start.xml file to c:\windows\system32\.
In your image run gpedit to Edit your Local Computer Policy.
Select Computer Configuration – Administrative Templates – Start Menu and Taskbar.
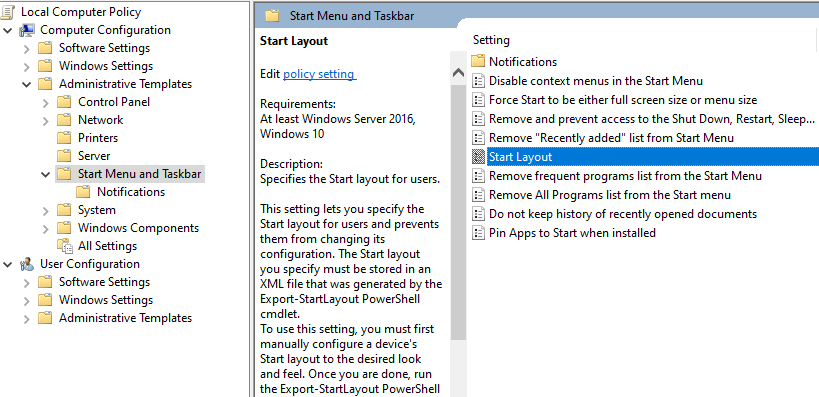
Right Click and select Edit on Start Layout in the right pane.
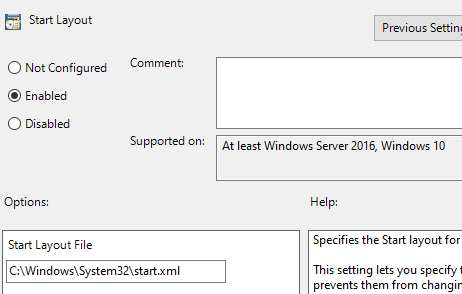
Enable the configuration and specify the location of the start.xml file. Click OK and close the Local Group Policy Editor.
On next boot the policy should be applied.
*Alternatively you can use domain policy with User Configuration for the xml file and item level targeting for specific departments to deploy custom layouts.
Checking for a malformed Layout xml
To check if the xml file is formatted correctly you can rung the following command in powershell.
Import-StartLayout –LayoutPath c:\windows\system32\start.xml –MountPath c:\
If formatted correctly it will jump to a blank input line, otherwise it will spit out errors in red.
Audit Mode and Local Account Removal
First we need to remove the user account that was created during the OS installation.
We’ll need to boot into Audit mode for that. Technically all software installations should occur in Audit mode, however some software requires reboots so we do this in regular mode.
You can boot into Audit mode and double check the installed software, additionally remove any user account you may have created during the setup process.
To boot into Audit mode navigate to C:\Windows\System32\Sysprep\.
You can do this via GUI or command line.
Command Line Method
cd c:\windows\system32\sysprep\
sysprep /generalize /audit /shutdown
... or
sysprep /generalize /audit /reboot
Make sure you take a snapshot of the VM before you perform this step, or take one during this step.
This will allow you to make changes to the image in the future.
I captured it before going into Audit mode, that way I can update the image in the future.
You can only perform OOBE 8 times on an image, after that you have to create a new image.
You can boot into Audit Mode as many times as you’d like.
GUI Method
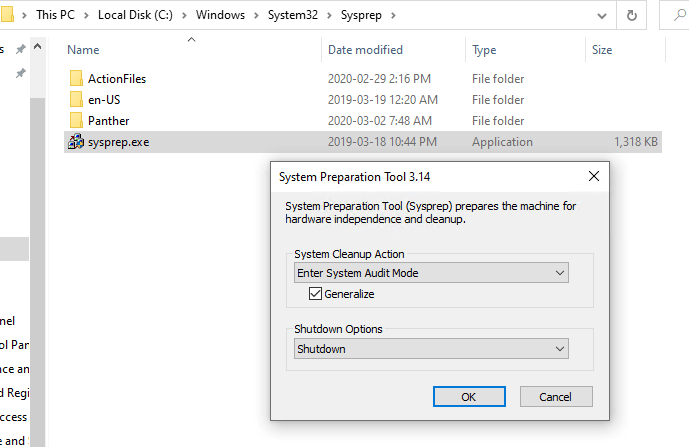
Same here, take a snapshot of the VM.
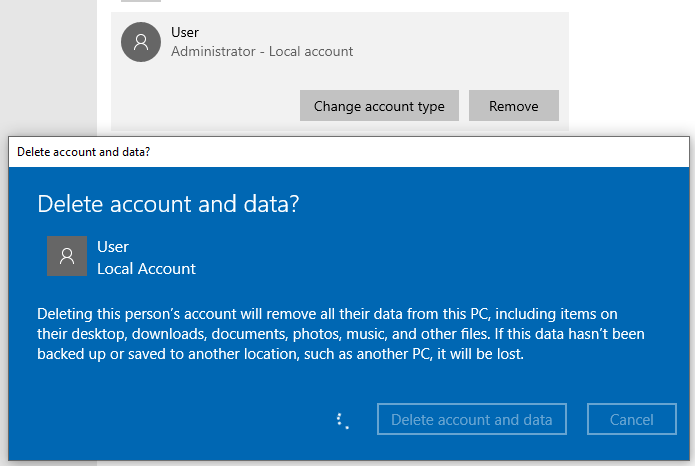
Remove Account
To remove the user account you created you need to be in Audit mode.
Note it will take a while to get into audit mode.
Also in audit mode you will see how your custom start layout get applied during deployment.
Once in there you can navigate to Start and Settings.


Select Accounts and Other users.
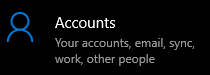

Then click remove on the account you wish to remove.
Other Customizations
Hide Cortana
reg add HKEY_CURRENT_USER\Software\Microsoft\Windows\CurrentVersion\Explorer\Advanced /v ShowCortanaButton /d 00000000 /f
Hide Search Bar
CMD /k reg add HKEY_CURRENT_USER\Software\Microsoft\Windows\CurrentVersion\Search /v SearchboxTaskbarMode /d 0x00000000 /f
The Above can be added to a bash script that can run on first log on.
You can put this script in the C:\Windows\OEM directory.
Shutdown into OOBE
Now that you have customized your image you can shutdown into the out of box exprience (OOBE).
sysprep.exe /generalize /shutdown /oobe
Navigate to C:\Windows\System32\Sysprep and execute the following command:
Now we’re ready to capture the image.
Capture OS with Dism
Full instructions are here; https://docs.microsoft.com/en-us/windows-hardware/manufacture/desktop/winpe-create-usb-bootable-drive
The idea is that we will export and mount the vhdx file inside Windows 10.
Then we will capture the image using dism on our system and move it to a bootable flash drive.
We will create the flash drive using a Windows 10 ISO and copy our wim file to it.
Finally we will create an unattended installation for all of this.
Export and Mount OOBE Chekpoint
Once the VM has shut down, create another VM checkpoint name it something the likes of OOBE.
Right click the Checkpoint and export it to a directory of your choosing.
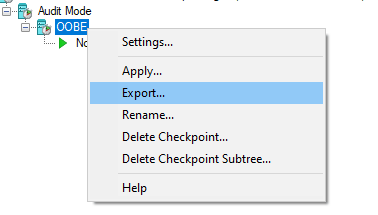
This may take some time.
Once the Checkpoint has exported navigate to the folder location you selected.
In my case it was located in C:\winpe_temp\OOBE.
In there there is the VM name folder navigate to it and Virtual Hard Disks, right click the main VHDX and select Mount. Take note of the drive letter, in this instance we’ll be working with P:
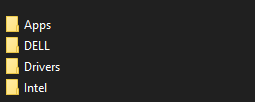
Copy any drivers or packages you want inside the Operating system when you deploy it.
Capture your OS deployment
Now that the VHDX is mounted we can capture it.
Start Deployment Image Servicing and Management tool as Administrator and run the following command to capture the OS image.
Dism /Capture-Image /ImageFile:<path_to_image_file> /CaptureDir:<source_directory> /Name:<image_name>
ImageFile is going to be the location where the wim file gets saved to.
CaptureDir is the drive letter of the mounted VHDX.
Name is just the descriptor of the new image file.
Ex.

*Note that unless you have multiple drives, or SSD/nVME drive this is going to take some time. On a platter drive this process can take hours.
An alternative to this is to create a Windows PE bootable flash drive and capture the image on a laptop or desktop, but you will need an external drive for that.
Mount Image and Inject Drivers
Next step is to mount the wim file you just captured and inject hardware specific drivers so the OS deploys with up to date and current drivers.
You can get wim information by running the following command.
Dism /Get-ImageInfo /ImageFile:c:\winpe_temp\Flyht_Devops_XPS.wim
This is useful if you want to know the index of a specific image inside the wim file.
Run the DI tools environment as administrator and mount the image
Dism /Mount-Image /Imagefile:C:\winpe_temp\Flyht_Devops_XPS.wim /Index:1 /Mountdir:C:\temp
This may take a while.
Locate your drivers that you want to add to the image.
Add the drivers to the image by running the following command.
Dism /Image:c:\temp /Add-Driver /Driver:"C:\Users\dspedzia\Documents\WinPE\9750 Drivers" /Recurse
Wait for it to finish and unmount the image.
Dism /Unmount-Image /MountDir:c:\temp /Commit
Now it’s time to create an installation disk.
Create a bootable Install Drive
Mount your Windows 10 iso and insert your flash drive into the system.
Take note of which drive letter the ISO and Flash Drive mounts to.
Your flash drive should be at least 4GB larger than your WIM file.
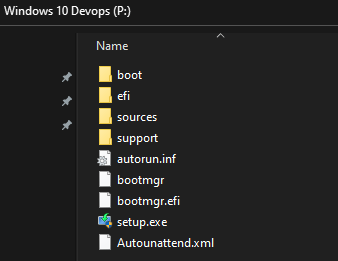
We will assume it mounts to drive letter T: and the flash drive is using drive letter P:.
Open up an administrative command prompt and run the following commands.
To locate the flash drive do the following;
C:\>diskpart

Microsoft DiskPart version 10.0.18362.1

Copyright (C) Microsoft Corporation.
On computer: FLYHT10047

DISKPART> list disk

  Disk ###  Status         Size     Free     Dyn  Gpt
  --------  -------------  -------  -------  ---  ---
  Disk 0    Online          931 GB  1024 KB
  Disk 1    Online          298 GB  1024 KB
  Disk 2    Online           28 GB      0 B
Generally you can determine the flash drive by the size of the disk in this case it’s Disk 2.
Now we’ll create a bootable flash drive;
diskpart
select disc 2
clean
create partition primary
active
format quick fs=ntfs label="Windows 10 Devops"
exit
Now we copy the contents of the Win10 ISO to the Flash drive.
xcopy t:\* p:\ /E
This can take a bit.
After this has been created you have 2 options depending on how you want to deploy your wim file.
You can either copy the Flyht_Devops_XPS.wim to the flash drive or a network location.
If you will be deploying this from a network location you need to make sure that your OS image has the proper network drivers and that it is connected to the network when you are deploying the OS.
You specify the location of the WIM file in the AutoUnattend.xml file.
Finally copy your custom WIM file into the same location as the install.wim, this is usually in the \sources folder on the flash drive.
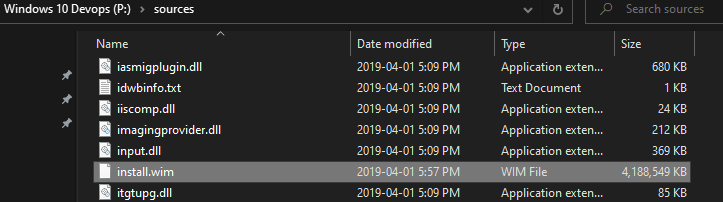
As previously stated alternatively copy your custom wim to a network location and share it with the domain join user.
Deployment
Copy the AutoUnattend.xml Answer File to the root of the flash drive.
Connect your desktop/laptop to a physical network, and boot from your flash drive.
Installation and domain join should be automatic, see below section to see how to do that.
Create AutoUnattend.xml Answer File
AutoUnattend.xml file allows you to deploy the OS with pre determined settings and automatically join the system to the domain.
Create AutoUnattend
To create the unattended installation file navigate to Windows Kits and select Windows System Image Manager.
Select FIle and Select Windows Image…
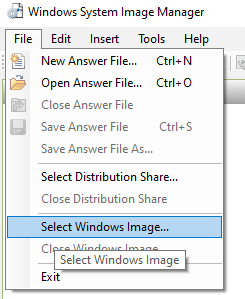
Locate and select your custom WIM file.
When Prompted select Yes to create a new catalog file.
This will take a little bit, once done it will load this file each subsequent time.
You will notice in the bottom left pane a Windows Image pane, it will populate with your Image name and a couple sub folders.
You will mostly be working with the Components sub folder.

After the catalog file is created click on new Answer file.
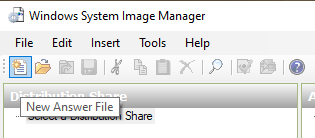
This will pop up in the middle top Answer File pane.
Note the numbers of the Components, they are Passes.
Pass 1 is windowsPE, Pass 2 is offline Servicing, Pass 3 is generalize, etc.

Pass 1 WindowsPE
amd64_Microsoft-Windows-International-Core-WinPE_neutral
Back to the Windows Image pane expand Components – Microsoft Windows International Core WinPE, right click StupUILanguage and add to Pass 1.

Back in the Answer File pane make the following changes.


Keep adding the components from the image to the Answer File for all the following components.
amd64_Microsoft–Windows-Setup_neutral
You will be adding the following sub components.

DiskConfiguration
Add the following sub components
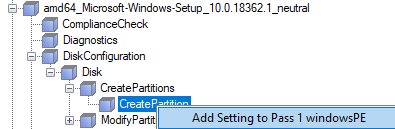
You will add the above several times in this example 6 times. Same does for Modify Partition.
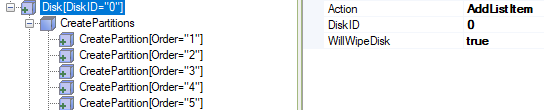
DiskID will be 0 and you will wipe it.
Create Partition
| Action | Extend | Order | Size | Type |
|---|---|---|---|---|
| AddListItem | false | 1 | 250 | Primary |
| AddListItem | false | 2 | 100 | EFI |
| AddListItem | false | 3 | 128 | MSR |
| AddListItem | false | 4 | 300000 | Primary |
| AddListItem | false | 5 | 100000 | Primary |
| AddListItem | true | 6 | Primary |
*Partition Order 5 will be used for Linux distro
Modify Partition
| Action | Active | Extend | Format | Label | Letter | Order | PartitionID | TypeID |
|---|---|---|---|---|---|---|---|---|
| AddListItem | NTFS | Recovery | 1 | 1 | de94bba4-06d1-4d40-a16a-bfd50179d6ac | |||
| AddListItem | FAT32 | System | 2 | 2 | ||||
| AddListItem | NTFS | Flyht | C | 3 | 4 | |||
| AddListItem | NTFS | Data | D | 4 | 6 |
*TypeID for Recovery partition must match example
Image Install
Add OSImage InstallFrom, Credentials and MetaData. Also add InstallTo.
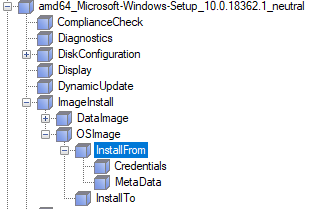
Add and make the following changes to these components.
| Sub Component | Property | Value | Alternative Value |
|---|---|---|---|
| ImageInstall/OSImage | Compact | false | |
| WillShowUI | On Error | ||
| ImageInstall/OSImage/InstallFrom | Path | /Devops_XPS.wim | \\servername\share\Devops_XPS.wim |
| ImageInstall/OSImage/InstallFrom/Credentials | Domain | domain.local | |
| Password | somedomainpassword | ||
| Username | domainjoin | ||
| ImageInstall/OSImage/InstallFrom/MetaData | Action | AddListItem | |
| Key | /IMAGE/INDEX | /IMAGE/NAME | |
| Value | 1 | Devops_XPS_Image | |
| ImageInstall/OSImage/InstallTo | DiskID | 0 | |
| PartitionID | 4 |
As you can see you can store your wim images on the network, this is particularly useful when the image exceeds the size of a flash drive.
You will only need the credentials component if you are deploying from a network share, otherwise you can remove it.
UserData
| Sub Component | Property | Value |
|---|---|---|
| UserData | AcceptEula | true |
| FullName | Nerd Drivel | |
| Organization | Nerd Drivel | |
| UserData/ProductKey | Key | VK7JG-NPHTM-C97JM-9MPGT-3V66T |
| WillShowUI | Never |
The above key is an RTM generic key used for OEM deployments, after installation Windows activates with the stored key inside the BIOS
Read More: https://www.tenforums.com/tutorials/95922-generic-product-keys-install-windows-10-editions.html
Pass 4 specialize
Add the following components.

amd64_Microsoft-Windows-Shell-Setup_neutral
Change the following values.
| Sub Component | Property | Value |
|---|---|---|
| ComputerName | COMPUTER10056 | |
| DisableAutoDaylightTimeSet | false | |
| DoNotCleanTaskBar | true | |
| ProductKey | VK7JG-NPHTM-C97JM-9MPGT-3V66T | |
| RegisteredOrganization | Nerd Drivel | |
| RegisteredOwner | Nerd Drivel | |
| ShowPowerButtonOnStartScreen | true | |
| TimeZone | Mountain Standard Time |
amd64_Microsoft-Windows-UnattendedJoin_neutral
| Sub Component | Property | Value |
|---|---|---|
| Identification | DebugJoin | false |
| DebugJoinOnlyOnThisError | 0 | |
| JoinDomain | domain.local | |
| MachineObjectOU | OU=Computers,OU=MyCity,OU=Sites,DC=domain,DC=local | |
| TimeoutPeriodInMinutes | 0 | |
| UnsecureJoin | false | |
| Identification/Credentials | Domain | domain.local |
| Password | somedomainpassword | |
| Username | domainjoin |
Pass 7 oobeSystem
Add the following components.
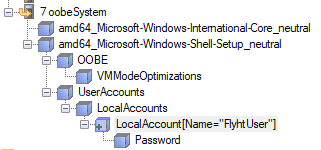
amd64_Microsoft-Windows-international-Core_neutral
| Sub Component | Property | Value |
|---|---|---|
| InputLocale | en-US | |
| SystemLocale | en-CA | |
| UILanguage | en-US | |
| UiLanguageFallback | en-CA | |
| UserLocale | en-CA |
amd64_Microsoft-Windows-Shell-Setup_neutral
| Sub Component | Property | Value |
|---|---|---|
| Sub Component | Property | Value |
| OOBE | HideEULAPage | true |
| HideLocalAccountScreen | true | |
| HideOEMRegistrationScreen | true | |
| HideOnlineAccountScreens | true | |
| HideWirelessSetupInOOBE | true | |
| ProtectYourPC | 2 | |
| OOBE/VMModeOptimizations | SkipAdministraorProfileRemoval | false |
| SkipNotifyUILanguageChange | true | |
| SkipWinREInitialization | true | |
| UserAccounts/LocalAccounts/LocalAccount | Action | AddListItem |
| Description | Local User Account | |
| DisplayName | User | |
| Group | Administrators | |
| Name | User | |
| UserAccounts/LocalAccounts/LocalAccount/Password | Value | mypassword |
Deployment Notes
Each subsequent deployment you only need to change the computer name in Pass 4.
Always edit the computer name in Windows System Image Manager otherwise the file can be malformed and the deployment will fail.
Autounattend.XML example
<?xml version="1.0" encoding="utf-8"?>
<unattend xmlns="urn:schemas-microsoft-com:unattend">
    <settings pass="windowsPE">
        <component name="Microsoft-Windows-International-Core-WinPE" processorArchitecture="amd64" publicKeyToken="31bf3856ad364e35" language="neutral" versionScope="nonSxS" xmlns:wcm="http://schemas.microsoft.com/WMIConfig/2002/State" xmlns:xsi="http://www.w3.org/2001/XMLSchema-instance">
            <SetupUILanguage>
                <UILanguage>en-US</UILanguage>
            </SetupUILanguage>
            <UserLocale>en-CA</UserLocale>
            <UILanguageFallback>en-CA</UILanguageFallback>
            <SystemLocale>en-CA</SystemLocale>
            <InputLocale>en-US</InputLocale>
            <UILanguage>en-US</UILanguage>
        </component>
        <component name="Microsoft-Windows-Setup" processorArchitecture="amd64" publicKeyToken="31bf3856ad364e35" language="neutral" versionScope="nonSxS" xmlns:wcm="http://schemas.microsoft.com/WMIConfig/2002/State" xmlns:xsi="http://www.w3.org/2001/XMLSchema-instance">
            <DiskConfiguration>
                <Disk wcm:action="add">
                    <CreatePartitions>
                        <CreatePartition wcm:action="add">
                            <Order>1</Order>
                            <Type>Primary</Type>
                            <Size>250</Size>
                        </CreatePartition>
                        <CreatePartition wcm:action="add">
                            <Order>2</Order>
                            <Type>EFI</Type>
                            <Size>100</Size>
                        </CreatePartition>
                        <CreatePartition wcm:action="add">
                            <Order>3</Order>
                            <Size>128</Size>
                            <Type>MSR</Type>
                        </CreatePartition>
                        <CreatePartition wcm:action="add">
                            <Order>4</Order>
                            <Extend>false</Extend>
                            <Type>Primary</Type>
                            <Size>300000</Size>
                        </CreatePartition>
                        <CreatePartition wcm:action="add">
                            <Order>5</Order>
                            <Type>Primary</Type>
                            <Size>100000</Size>
                        </CreatePartition>
                        <CreatePartition wcm:action="add">
                            <Order>6</Order>
                            <Extend>true</Extend>
                            <Type>Primary</Type>
                        </CreatePartition>
                    </CreatePartitions>
                    <ModifyPartitions>
                        <ModifyPartition wcm:action="add">
                            <Order>1</Order>
                            <PartitionID>1</PartitionID>
                            <Format>NTFS</Format>
                            <Label>Recovery</Label>
                            <TypeID>de94bba4-06d1-4d40-a16a-bfd50179d6ac</TypeID>
                        </ModifyPartition>
                        <ModifyPartition wcm:action="add">
                            <Order>2</Order>
                            <PartitionID>2</PartitionID>
                            <Label>System</Label>
                            <Format>FAT32</Format>
                        </ModifyPartition>
                        <ModifyPartition wcm:action="add">
                            <Order>3</Order>
                            <PartitionID>4</PartitionID>
                            <Label>Nerd Drivel</Label>
                            <Format>NTFS</Format>
                            <Letter>C</Letter>
                        </ModifyPartition>
                        <ModifyPartition wcm:action="add">
                            <Order>4</Order>
                            <Format>NTFS</Format>
                            <Label>Data</Label>
                            <Letter>D</Letter>
                            <PartitionID>6</PartitionID>
                        </ModifyPartition>
                    </ModifyPartitions>
                    <DiskID>0</DiskID>
                    <WillWipeDisk>true</WillWipeDisk>
                </Disk>
                <WillShowUI>OnError</WillShowUI>
            </DiskConfiguration>
            <UserData>
                <ProductKey>
                    <WillShowUI>Never</WillShowUI>
                    <Key>VK7JG-NPHTM-C97JM-9MPGT-3V66T</Key>
                </ProductKey>
                <AcceptEula>true</AcceptEula>
                <Organization>Nerd Drivel</Organization>
                <FullName>Nerd Drivel</FullName>
            </UserData>
            <EnableFirewall>false</EnableFirewall>
            <EnableNetwork>true</EnableNetwork>
            <ImageInstall>
                <OSImage>
                    <InstallTo>
                        <DiskID>0</DiskID>
                        <PartitionID>4</PartitionID>
                    </InstallTo>
                    <InstallFrom>
                        <Path>/Devops_XPS.wim</Path>
                        <MetaData wcm:action="add">
                            <Key>/IMAGE/INDEX</Key>
                            <Value>1</Value>
                        </MetaData>
                    </InstallFrom>
                    <WillShowUI>OnError</WillShowUI>
                </OSImage>
            </ImageInstall>
        </component>
    </settings>
    <settings pass="specialize">
        <component name="Microsoft-Windows-UnattendedJoin" processorArchitecture="amd64" publicKeyToken="31bf3856ad364e35" language="neutral" versionScope="nonSxS" xmlns:wcm="http://schemas.microsoft.com/WMIConfig/2002/State" xmlns:xsi="http://www.w3.org/2001/XMLSchema-instance">
            <Identification>
                <Credentials>
                    <Domain>domain.local</Domain>
                    <Username>domainjoin</Username>
                    <Password></Password>
                </Credentials>
                <JoinDomain>domain.local</JoinDomain>
                <MachineObjectOU>OU=Computers,OU=MyCity,OU=Sites,DC=domain,DC=local</MachineObjectOU>
            </Identification>
        </component>
        <component name="Microsoft-Windows-Shell-Setup" processorArchitecture="amd64" publicKeyToken="31bf3856ad364e35" language="neutral" versionScope="nonSxS" xmlns:wcm="http://schemas.microsoft.com/WMIConfig/2002/State" xmlns:xsi="http://www.w3.org/2001/XMLSchema-instance">
            <ComputerName>COMPUTER10056</ComputerName>
            <BluetoothTaskbarIconEnabled>true</BluetoothTaskbarIconEnabled>
            <DisableAutoDaylightTimeSet>false</DisableAutoDaylightTimeSet>
            <DoNotCleanTaskBar>true</DoNotCleanTaskBar>
            <RegisteredOrganization>Nerd Drivel</RegisteredOrganization>
            <ShowPowerButtonOnStartScreen>true</ShowPowerButtonOnStartScreen>
            <TimeZone>Mountain Standard Time</TimeZone>
            <ProductKey>VK7JG-NPHTM-C97JM-9MPGT-3V66T</ProductKey>
            <RegisteredOwner>Nerd Drivel</RegisteredOwner>
        </component>
    </settings>
    <settings pass="oobeSystem">
        <component name="Microsoft-Windows-Shell-Setup" processorArchitecture="amd64" publicKeyToken="31bf3856ad364e35" language="neutral" versionScope="nonSxS" xmlns:wcm="http://schemas.microsoft.com/WMIConfig/2002/State" xmlns:xsi="http://www.w3.org/2001/XMLSchema-instance">
            <OOBE>
                <VMModeOptimizations>
                    <SkipWinREInitialization>true</SkipWinREInitialization>
                    <SkipNotifyUILanguageChange>true</SkipNotifyUILanguageChange>
                    <SkipAdministratorProfileRemoval>false</SkipAdministratorProfileRemoval>
                </VMModeOptimizations>
                <HideEULAPage>true</HideEULAPage>
                <HideLocalAccountScreen>true</HideLocalAccountScreen>
                <HideWirelessSetupInOOBE>true</HideWirelessSetupInOOBE>
                <ProtectYourPC>2</ProtectYourPC>
                <HideOEMRegistrationScreen>true</HideOEMRegistrationScreen>
                <HideOnlineAccountScreens>true</HideOnlineAccountScreens>
            </OOBE>
            <UserAccounts>
                <LocalAccounts>
                    <LocalAccount wcm:action="add">
                        <Password>
                            <Value>LKJHDFLalkdjfhatiGKJLKalgeriouyklajdf=</Value>
                            <PlainText>false</PlainText>
                        </Password>
                        <Description>Local User Account</Description>
                        <DisplayName>User</DisplayName>
                        <Group>Administrators</Group>
                        <Name>User</Name>
                    </LocalAccount>
                </LocalAccounts>
            </UserAccounts>
            <TimeZone>Mountain Standard Time</TimeZone>
            <RegisteredOrganization>Nerd Drivel</RegisteredOrganization>
            <RegisteredOwner>Nerd Drivel</RegisteredOwner>
        </component>
        <component name="Microsoft-Windows-International-Core" processorArchitecture="amd64" publicKeyToken="31bf3856ad364e35" language="neutral" versionScope="nonSxS" xmlns:wcm="http://schemas.microsoft.com/WMIConfig/2002/State" xmlns:xsi="http://www.w3.org/2001/XMLSchema-instance">
            <InputLocale>en-US</InputLocale>
            <SystemLocale>en-CA</SystemLocale>
            <UILanguage>en-US</UILanguage>
            <UILanguageFallback>en-CA</UILanguageFallback>
            <UserLocale>en-CA</UserLocale>
        </component>
    </settings>
    <cpi:offlineImage cpi:source="wim://computer10047/cwinpe_temp/Devops_XPS.wim#Devops_XPS_Image" xmlns:cpi="urn:schemas-microsoft-com:cpi" />
</unattend>

Leave a comment