
A lot of instructions on the net tell you how to use the answer file to create the base image for capturing but nothing in regards to installation. Nice thing about creating the AutoUnattend.xml for capturing is that it will not create a new user profile, since you will be booting into the OS in audit mode. Audit mode allows you to go in generalize the OS install updates and software then seal it with the Out of Box Experience. I usually install the OS in a vm, enter audit mode, run all the windows updates, then use the generalize option for the OOBE experience. Then I capture the OS in WinPE.
The AutoUnattend.xml will differ slightly between the capture and install versions.
To create and unattended xml, you will need to extract the install.wim from the windows ISO. Mount the ISO with Virtual Clone Drive from SlySoft and copy “./sources/install.wim” to somewhere on your computer. If you don’t want to use the free software from SlySoft you can alternatively use 7Zip to explore the ISO archive and extract the install.wim file.
Open Windows System Image Manager, and in the Windows Image pane right click and select “Select Windows Image…” then locate the install.wim file you extracted/copied from the ISO and open it. This will prompt you with the image selection screen, select the appropriate windows distribution.

Expand the Components section. The components are used to automate the installatio n steps during deployment, this will allow you to create a fully automatic installation ISO or flash drive installer. These are added to the Answer File passes. The answer file has 7 passes, more than likely you will not use most of them. First step will be to automate the WindowsPe pass. This will talk about the 64 bit version of tje operating system. If you are still using a 32 bit OS you are doing it wrong.
Capture XML
All the components you will use will be preceded by amd64_…
For the capture xml select the following packages for the respective passes.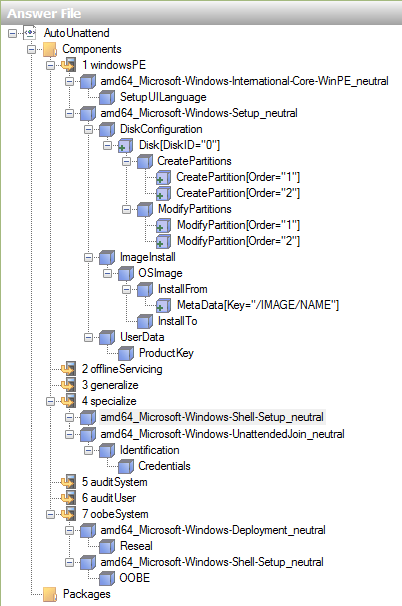
Note that when selecting these you have to right click the nested option and add to Answer File, otherwise it will only select the root selection and not the nested option.
In the Unattend file we will only use pass 1, 4, and 7. Your AutoUnattend.xml should be placed on the root of a flash drive is you’re installing from a DVD, and the flash drive should be present during installation. If you want to install the OS from a flash drive then after you have copied the contents of Windows onto the flash drive also copy the AutoUnattend.xml to the root of the drive. Same applies for custom iso.
Always edit the xml file inside Windwos System Image Manager, if you try and edit the file in an xml viewer or a third party app like Notepad ++ I found that is sometimes messes with the formatting and then Windows will not pick up the xml during the installation. It somehow invalidates the file, there must be a sort of signature of specific formatting it adds to the file.
Check out the following settings for each pass and nested optiong. You can see which pass it belongs to based on the Id field in each image.
Pass 1. Here you is the Language options which is the first screen you are prompted with when installing windows. I think I should have changed my system locale to en-CA as well, oh well next time.

Then comes the actual nested option. For the most part the WillShowUI option will always be changed OnError. This will surpress most of the selections during installation.

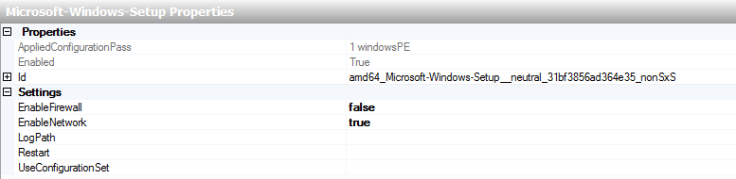
I disable the built in firewall on corporate networks, I find that it interferes with a lot of applications and is really not that necessary.
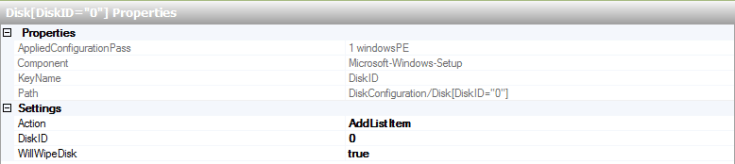
 Disk 0 is generally the first disk in most computer systems and where the Operating System should reside. If that is not the case for your environment then change it to the appropriate disk id.
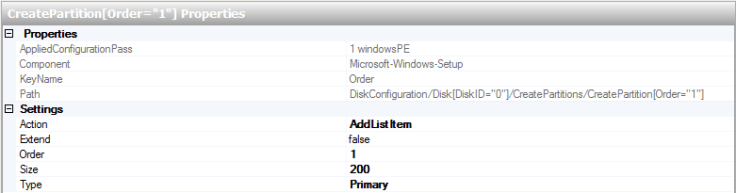
Here is where the unattend file creates the System partition, it will be the first in order, a primary partition and 200mb in size. Note the Extend option is set to false. The system partition contains the hardware-related files and the Boot folder that tell a computer where to look to start Windows.
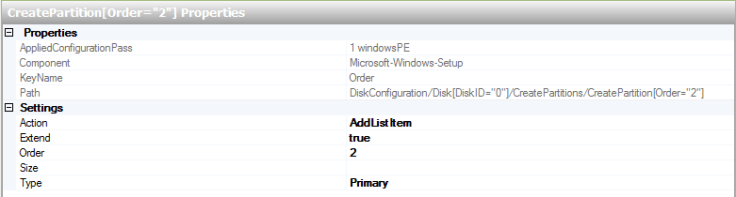
Here we create the partition where the OS will be installed to. Extend option is set to true, this means that the partition will take up the rest of the disk.
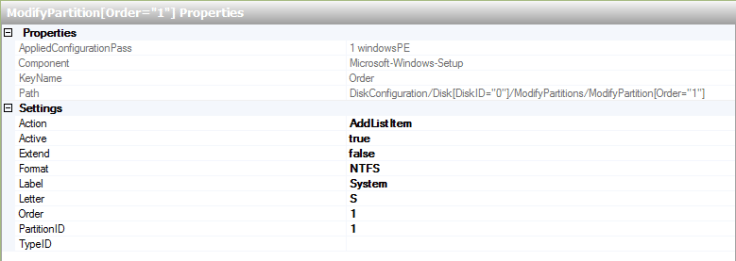
Here we modify/format the System partition, key is setting the Active flag to true. Please omit using the Extend option in the Modify Partition property, it does not work properly.
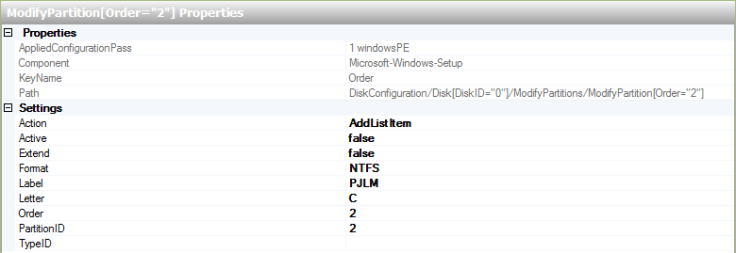
Here we modify the partition where the OS will sit and be installed on.
Do not install to available partition, you’ll get the chance to specify where you can install it.

Here you can specify which OS you would like to install, this Key can be set based on the /IMAGE/NAME , /IMAGE/INDEX, and /IMAGE/DESCRIPTION, and the Value field coresponds the the Key that you have set. So if you have a captured image at index 2 you can change that here…

Here is where you set which disk and partition the OS is to be installed on.

Accept the Eula and set the Organization name if you wish.

This is not the spot for the Product Key, omit putting the key in here this will be done in a later spot.

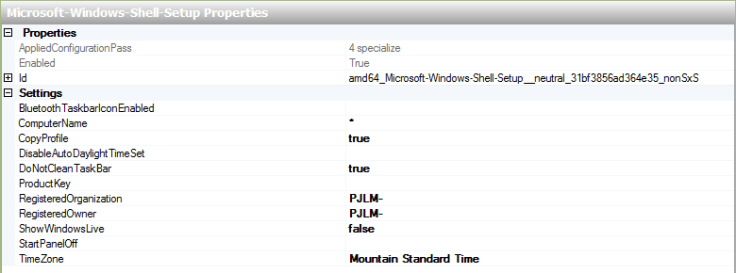
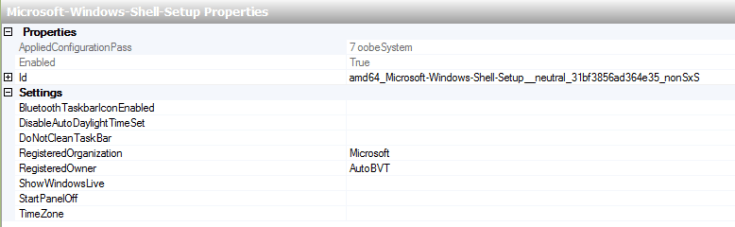
Pass 4 the specialize section. The * in the computer name will yield in a random computer name that will be preceded with the PJLM- as seen in RegisteredOrganization and RegisteredOwner fields. Copy profile will copy the default profile that can be setup during audit mode to a user when they log in for the first time to a newly set up computer.
Here is where you specify which domain you would like the computer to join and which OU is should reside in. Remember that the MachineObjectOU hierarchy is backwards, so if you have an asset sitting in Computers -> Desktop ou you would start with the Desktop ou and end with the first ou in hierarchy.
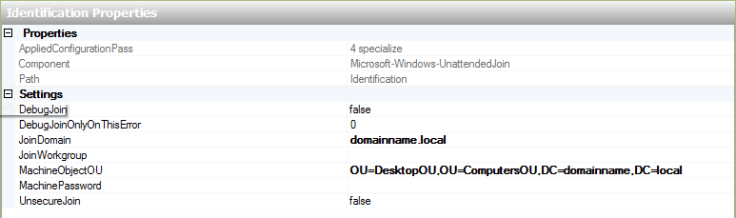
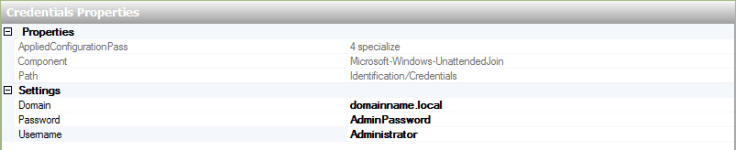
Here is where you enter the credentials for the domain join. Make sure the account you are using to join the computers to the domain has valid access to do so.
Pass 7 is where we specify the Out of Box Experience (oobe) settings. This part is the one that will differ most from the capture and the installation AutoUnattend.xml. Below you can see Audit mode, in audit mode you can generalize the desktop and install any updates and/or software that you might want in your image. You are doing all of this in the default user profile, no credentials necessary when you enter into this mode. What I usually do here since I do all of this in a VM is I run all the windows updates and take snapshot of the VM. This way I can always come back to the VM snapshot and tweak it more in the future or install more windows updates or software. You can customize the task bar and other things. Also to note in this mode you will see the SysPrep window appear, if you install windows updates that require a reboot select Audit in the SysPrep windows and do not check off Generalize, just reboot. Once you finish in Audit mode select OOBE, Generalize and Shutdown.

If you customized your taskbar you can specify in the below component not to clean it, so if you installed a web browser and added the icon to the taskbar you can have that copied to other profiles on the computer when they get created.
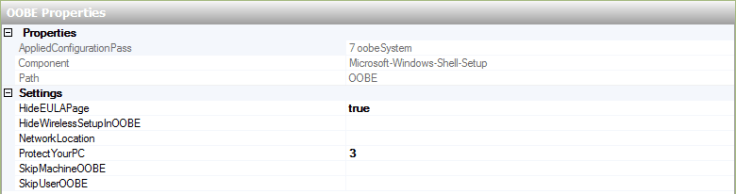
This isn’t really that important for the capture process, but here you can essentially skip the naming of the machine or skip the account creation process during installation. Again I wouldn’t worry about it since you enter audit mode first, then you’re sealing the OS for oobe anyways. This is more applicable to the installation xml file and not the capture one. ProtectYourPC setting is essentially the Windows Update setting during setup. 1, specifies the recommended level of protection for the computer, 2 specifies that only updates are installed, and 3 specifies that automatic protection/updates are disabled.
Once you finish your xml file, boot up a VM, attach your Windows 7 iso and make sure you have a USB drive with the AutoUnattend.xml on the root of the drive, the installation automatically searches for this file and uses it for the answers required during installation. Go through the installation process generalize the installation, enter OOBE and shutdown. Then use WindowsPE to capture the installation you just created.

Installation XML
For the installation xml file or AutoUnattend.xml select the following Components in Windows System Image Manager.
Note the difference in the windowsPE pass or Pass 1 under Windows Setup, ImageInstall and the MetaData. The KEY here refrences the /IMAGE/INDEX key that’s because I don’t use names or descriptions when capturing the image and usually in my wim there is only a single index/single image. The other major difference between this file and the one used to capture the image is the oobeSystem component in Pass 7.
 This is where you are prompted for the user account creation and Windows Update settings. In this step I create a local User account with a generic password which I later remove with Group Policy. Next I will only highlight the difference in Components between the file settings for the capture process and the installation process.
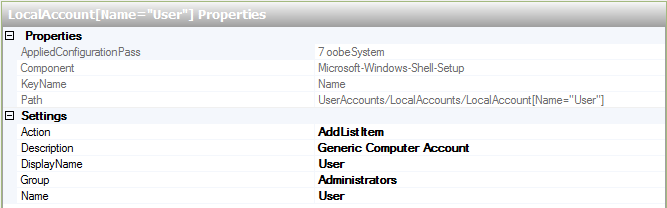
As previously mentioned Pass 1 will pretty much remain the same, the only difference here will be the MetaData Key value. Instead of /IMAGE/NAME I used /IMAGE’/INDEX. The reason for this is that I captured the WIM without a name or description, so I had to use the index # which it was captured with, I used index 1.
The major difference will occur in Pass 7: oobe. The difference will be the lack of the Reseal component which allows you to enter into Audit mode. Since this file is for deployment this step is not necessary. Also note in the screen shot above that I create a local user account, this is so that the prompt for the user creation is bypassed for a true unattended installation. I tried to use a domain account however this did not seem to work, I think this was due to the lack of network support during this installation step, either way I opted to create a local account. If you wish to remove it you could do so with Group Policy when it is joined to the domain.
Once you have created the above XML I suggest you test it to make sure it is a true unattended installation of Windows. The above steps should not differ much between Windows 7 and Windows 8.
That’s pretty much it now you can create a custom ISO.
Custom ISO
To create a custom iso first you need to extract the windows 7 DVD to a directory in this example I used C:\WIN7ISO.
From a command line use; xcopy /E <source dir> <destination dir> , source will be the DVD drive letter and destination will be C:\WIN7ISO directory that was created. “xcopy /E d:\*.* c:\win7iso\”
This will take a minute to copy.
Once you have copied the contents of the DVD to your hard drive, put the AutoUnattend.xml in to the root directory of C:\WIN7ISO. Also in the sources directory where you extracted the ISO, delete the install.wim file or move it outside of the DVD structure. Then copy the custom WIM you captured in it’s place and rename it to install.wim. This will create a custom bootable media with your Win 7 OS. Applications and all.
To create a bootable Windows 7 ISO start the Deployment Tools command prompt and type in the following command, substitute your file paths accordingly. The command is similar to the one used when creating the bootable WinPE ISO.
Usage: oscdimg.exe [options] <source directory> <destination ISO>
oscdimg.exe -bC:\WIN7ISO\boot\etfsboot.com -u2 -h -m -lWIN_7_PRO C:\WIN7ISO c:\WIN7PJLM.iso
–b<directory> points to the etfsboot.com file which is necessary for bootable media such as CDs and DVDs. This file will be written to the boot sector of the disk.
–u2 this option is used to produce an image that has only the UDF file system on it.
-h this option will include all hidden files and directories under the source path for this image.
–m specifies that the file size can be larger than the maximum size limit.
–l<volume label> is the label of the media that will be created.
That’s it.
Wondows 10 template
Here is an UEFI Windows 10 Pro version 1803 xml template for Autounattend.XML. This has two disk drives inside the machine so the xml takes that into account.
Also note that the WIM file sits on the network since it’s too large to fit on a fat32 formatted flash drive. Fat32 has a limit of 4GB file sizes, so I had to put it on the network. If you turn this into an ISO it should be fine, I prefer to work with flash drives however. This template also auto domain joins the machine and puts it in a specified OU in AD.
<?xml version="1.0" encoding="utf-8"?>
<unattend xmlns="urn:schemas-microsoft-com:unattend">
    <settings pass="windowsPE">
        <component name="Microsoft-Windows-International-Core-WinPE" processorArchitecture="amd64" publicKeyToken="31bf3856ad364e35" language="neutral" versionScope="nonSxS" xmlns:wcm="http://schemas.microsoft.com/WMIConfig/2002/State" xmlns:xsi="http://www.w3.org/2001/XMLSchema-instance">
            <SetupUILanguage>
                <UILanguage>en-US</UILanguage>
            </SetupUILanguage>
            <UserLocale>en-CA</UserLocale>
            <UILanguageFallback>en-CA</UILanguageFallback>
            <SystemLocale>en-US</SystemLocale>
            <InputLocale>en-US</InputLocale>
            <UILanguage>en-US</UILanguage>
        </component>
        <component name="Microsoft-Windows-Setup" processorArchitecture="amd64" publicKeyToken="31bf3856ad364e35" language="neutral" versionScope="nonSxS" xmlns:wcm="http://schemas.microsoft.com/WMIConfig/2002/State" xmlns:xsi="http://www.w3.org/2001/XMLSchema-instance">
            <DiskConfiguration>
                <Disk wcm:action="add">
                    <CreatePartitions>
                        <CreatePartition wcm:action="add">
                            <Order>1</Order>
                            <Type>Primary</Type>
                            <Size>250</Size>
                        </CreatePartition>
                        <CreatePartition wcm:action="add">
                            <Order>2</Order>
                            <Type>EFI</Type>
                            <Size>100</Size>
                        </CreatePartition>
                        <CreatePartition wcm:action="add">
                            <Order>3</Order>
                            <Size>128</Size>
                            <Type>MSR</Type>
                        </CreatePartition>
                        <CreatePartition wcm:action="add">
                            <Order>4</Order>
                            <Extend>true</Extend>
                            <Type>Primary</Type>
                        </CreatePartition>
                    </CreatePartitions>
                    <ModifyPartitions>
                        <ModifyPartition wcm:action="add">
                            <Order>1</Order>
                            <PartitionID>1</PartitionID>
                            <Format>NTFS</Format>
                            <Label>Recovery</Label>
                            <TypeID>de94bba4-06d1-4d40-a16a-bfd50179d6ac</TypeID>
                        </ModifyPartition>
                        <ModifyPartition wcm:action="add">
                            <Order>2</Order>
                            <PartitionID>2</PartitionID>
                            <Label>System</Label>
                            <Format>FAT32</Format>
                        </ModifyPartition>
                        <ModifyPartition wcm:action="add">
                            <Order>3</Order>
                            <PartitionID>4</PartitionID>
                            <Label>Operating System</Label>
                            <Format>NTFS</Format>
                            <Letter>C</Letter>
                        </ModifyPartition>
                    </ModifyPartitions>
                    <DiskID>0</DiskID>
                    <WillWipeDisk>true</WillWipeDisk>
                </Disk>
                <WillShowUI>OnError</WillShowUI>
                <Disk wcm:action="add">
                    <CreatePartitions>
                        <CreatePartition wcm:action="add">
                            <Extend>true</Extend>
                            <Order>1</Order>
                            <Type>Primary</Type>
                        </CreatePartition>
                    </CreatePartitions>
                    <ModifyPartitions>
                        <ModifyPartition wcm:action="add">
                            <Label>Storage</Label>
                            <Format>NTFS</Format>
                            <Order>1</Order>
                            <Letter>D</Letter>
                            <PartitionID>1</PartitionID>
                        </ModifyPartition>
                    </ModifyPartitions>
                    <DiskID>1</DiskID>
                    <WillWipeDisk>true</WillWipeDisk>
                </Disk>
            </DiskConfiguration>
            <UserData>
                <ProductKey>
                    <WillShowUI>Never</WillShowUI>
                </ProductKey>
                <AcceptEula>true</AcceptEula>
                <Organization>Some ORG</Organization>
                <FullName>My Company</FullName>
            </UserData>
            <EnableFirewall>false</EnableFirewall>
            <EnableNetwork>true</EnableNetwork>
            <ImageInstall>
                <OSImage>
                    <InstallTo>
                        <DiskID>0</DiskID>
                        <PartitionID>4</PartitionID>
                    </InstallTo>
                    <InstallFrom>
                        <Path>\\server01\IT\WIM\Win10-1803-image.wim</Path>
                        <Credentials>
                            <Domain>mydomain.local</Domain>
                            <Password>password</Password>
                            <Username>username</Username>
                        </Credentials>
                        <MetaData wcm:action="add">
                            <Key>/IMAGE/NAME</Key>
                            <Value>Windows 10 Pro</Value>
                        </MetaData>
                    </InstallFrom>
                    <WillShowUI>OnError</WillShowUI>
                </OSImage>
            </ImageInstall>
        </component>
    </settings>
    <settings pass="specialize">
        <component name="Microsoft-Windows-Shell-Setup" processorArchitecture="amd64" publicKeyToken="31bf3856ad364e35" language="neutral" versionScope="nonSxS" xmlns:wcm="http://schemas.microsoft.com/WMIConfig/2002/State" xmlns:xsi="http://www.w3.org/2001/XMLSchema-instance">
            <BluetoothTaskbarIconEnabled>true</BluetoothTaskbarIconEnabled>
            <ComputerName>Computer-28</ComputerName>
            <TimeZone>Mountain Standard Time</TimeZone>
            <ShowPowerButtonOnStartScreen>true</ShowPowerButtonOnStartScreen>
            <RegisteredOrganization>Some ORG</RegisteredOrganization>
            <ProductKey>VK7JG-NPHTM-C97JM-9MPGT-3V66T</ProductKey>
            <DisableAutoDaylightTimeSet>false</DisableAutoDaylightTimeSet>
            <DoNotCleanTaskBar>true</DoNotCleanTaskBar>
            <RegisteredOwner></RegisteredOwner>
            <OEMName></OEMName>
        </component>
        <component name="Microsoft-Windows-UnattendedJoin" processorArchitecture="amd64" publicKeyToken="31bf3856ad364e35" language="neutral" versionScope="nonSxS" xmlns:wcm="http://schemas.microsoft.com/WMIConfig/2002/State" xmlns:xsi="http://www.w3.org/2001/XMLSchema-instance">
            <Identification>
                <Credentials>
                    <Domain>mydomain.local</Domain>
                    <Username>username</Username>
                    <Password>password</Password>
                </Credentials>
                <JoinDomain>mydomain.local</JoinDomain>
                <MachineObjectOU>OU=DesktopOU,OU=ComputersOU,DC=mydomain,DC=local</MachineObjectOU>
            </Identification>
        </component>
    </settings>
    <settings pass="oobeSystem">
        <component name="Microsoft-Windows-Shell-Setup" processorArchitecture="amd64" publicKeyToken="31bf3856ad364e35" language="neutral" versionScope="nonSxS" xmlns:wcm="http://schemas.microsoft.com/WMIConfig/2002/State" xmlns:xsi="http://www.w3.org/2001/XMLSchema-instance">
            <OOBE>
                <VMModeOptimizations>
                    <SkipWinREInitialization>true</SkipWinREInitialization>
                    <SkipNotifyUILanguageChange>true</SkipNotifyUILanguageChange>
                    <SkipAdministratorProfileRemoval>true</SkipAdministratorProfileRemoval>
                </VMModeOptimizations>
                <HideEULAPage>true</HideEULAPage>
                <HideLocalAccountScreen>true</HideLocalAccountScreen>
                <HideWirelessSetupInOOBE>true</HideWirelessSetupInOOBE>
                <ProtectYourPC>2</ProtectYourPC>
                <HideOEMRegistrationScreen>true</HideOEMRegistrationScreen>
                <HideOnlineAccountScreens>true</HideOnlineAccountScreens>
            </OOBE>
            <UserAccounts>
                <LocalAccounts>
                    <LocalAccount wcm:action="add">
                        <Password>
                            <Value>somepassword</Value>
                            <PlainText>false</PlainText>
                        </Password>
                        <Description>Local User Account</Description>
                        <DisplayName>PCAccount</DisplayName>
                        <Group>Administrators</Group>
                        <Name>User</Name>
                    </LocalAccount>
                </LocalAccounts>
            </UserAccounts>
            <TimeZone>Mountain Standard Time</TimeZone>
            <RegisteredOrganization>Some ORG</RegisteredOrganization>
            <RegisteredOwner>My Company</RegisteredOwner>
        </component>
        <component name="Microsoft-Windows-International-Core" processorArchitecture="amd64" publicKeyToken="31bf3856ad364e35" language="neutral" versionScope="nonSxS" xmlns:wcm="http://schemas.microsoft.com/WMIConfig/2002/State" xmlns:xsi="http://www.w3.org/2001/XMLSchema-instance">
            <InputLocale>en-US</InputLocale>
            <SystemLocale>en-CA</SystemLocale>
            <UILanguage>en-US</UILanguage>
            <UILanguageFallback>en-CA</UILanguageFallback>
            <UserLocale>en-CA</UserLocale>
        </component>
    </settings>
    <cpi:offlineImage cpi:source="wim:x:/iso/w10_1803.wim#Windows 10 Pro" xmlns:cpi="urn:schemas-microsoft-com:cpi" />
</unattend>

Did you forget to enter the License Key in step 7 (oobe) ? 🙂
Great tutorial !
Sorry, correction about the step. License key (MAK or KMS) should be step 4 under Specialize.