
Tools:
I have scoured the internet for a solution to my long standing problem with my crossfire setup. After much digging my searches yielded no results. I noticed a problem where the cards when in Crossfire would artifact if they were sitting idle on the destop. I have the problem documented here.
Inside my computer I have two R9 290x cards by Gigabyte in crossfire, these are the Windforce editions. The exact model is GV-R929XOC-4GD, one uses the F2 BIOS the other uses the F11 BIOS. When I game the temps on average are about 60-70 degrees Celsius on the GPU cores, and about 95-100 degrees on the VRM. My CPU doesn’t exceed 45 degrees. Cards are at clock speeds and both BIOS versions are the same, I recently updated the BIOS on both cards, but that did not fix the issue.
In short I can do about an 2 hour gaming session and everything runs smoothly, then when I exit to desktop I get artifacts, lines coming across all 3 monitors, but as soon as I go into a game again these lines disappear. Back to desktop the lines re appear again. I bring up anything graphical like a web page or youtube, the lines will disappear, if I minimize the browser the lines reappear. If I stay on the desktop and disable crossfire, again the lines will immediately disappear.
I initially suspected it was the fact that I was running a crossfire set up. My other suspicion was that despite both cards being the same make one has memory chips by Hynix(F11 BIOS) and the other by Elpida(F2 BIOS). I believed that the problem was with the memory or rather something to do with the memory.
Note worthy, when only running a single card this artifacting problem does not occur. It only happens in crossfire and when the cards are in a low power state mode, idle, or rather when the clocks are dropped to conserve energy.
After much tweaking of the system and performing various tests it all came down to the Memory Clock, the clocks on the memory were being stepped down to almost nothing. The reason I suspected the clocks is that when I went into a graphically intensive application the problem disappeared. And the reason I knew it wasn’t the Core clock and it was the memory clock, the core clock would clock up on demand but the memory clock would not, it had two states 150 Mhz or 1250 Mhz, and it only propped up to 1250 when something graphical was being presented on the desktop or a game was being played. During “power play” mode the cards core clock drops to 350 from potential 1040 and memory drops to 150 from 1250. Mind you the core can be stepped up on demand and it does this rather well the memory apparently not so much.
To edit the BIOS files and flash them they will require a *.rom extension. The files from the manufacturer did not have this extension, I renamed the files to include the .rom extension and flashed them using Atiflash, it worked and my cards are running fine.
In order to fix the issue I had to hex edit both the cards BIOS files and flash it with AtiFlash in DOS. I also disabled ULPS. Although ULPS is not a fix to the issue I like knowing that when I hop out of a game the fans will keep spinning to cool down my card to an acceptable temperature. I don’t like the idea of one card being passively cooled after it reached 80 degrees +. I essentially edited both the cards BIOS files to never drop the Memory clock, so now the memory clock is always at 1250Mhz. And this fixed the problem. There are other tweaks to the bios I made as well, and while not necessary I also edited the BIOS core clocks, the core now never drops below 500 Mhz, the next step up is 840 Mhz, and then 1040 Mhz. This was changed from 300 Mhz, 727 Mhz, and 1040 Mhz respectively. Below is a screen shot of the PowerPlay profile changes, original on the left, and edited on the right. 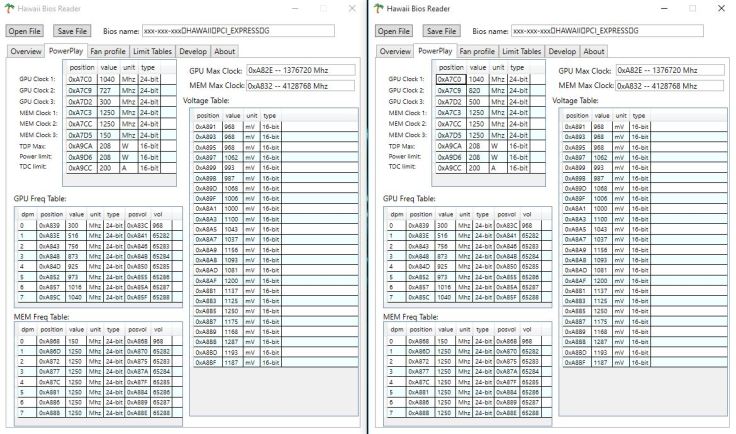
Finally I also changed my fan profiles and a single temp profile. Since I raised the Core clock slightly and the memory clock completely I wanted to make sure that the card was not running hot. So I raised the fan profiles by 10% and dropped the top temperature profile by 10° C.

The single temperature profile I was worried about was the 90° Celsius/100% fan, I changed it to 80° Celsius/100% fan speed. Then I raised the other fan speeds by 10%, so 56 went to 66%, and 25% went to 35%. You can see below the changes I have made to the Fan profile as displayed in Hawaii Bios Reader. Note that although Hawaii can read the Fan profiles these need to be changed in a hex editor such as HxD, only the PowerPlay values can be changed in the Hawaii Bios Reader. Alternatively you can use the Hawaii Fan Editor by DDSZ. The new version of the Hawaii Bios Reader can now edit the fan speeds and temperatures on the Fan profile page, it is no longer necessary to hex edit the ROM file.
The last step after the BIOS was edited I had to flash the file using Atiflash with in DOS. Download the boot disk and create a dos bootable flash drive. Place the rom file and atiflash in the root of the flash drive. Boot into dos and flash the new BIOS for your card. Remember to only do one card at a time and to power down after each flash. Also flash one bank at a time, I have my original and the new BIOS on each card, I used the performance bank to flash the custom BIOS. Atiflash usage is as follows:
atiflash -p 0 biosname.rom
With all these changes to the GPU BIOS on both cards I now have eliminated the Desktop artifacts. My idle card temps hover around 50° C, ~ 3-5 degrees higher than the stock BIOS clocks. And ULPS is disabled. Everything is peachy on the gaming PC.
Here are the two sample ROMs I created for my cards, F2 and F11.
For more detailed information check the below links and sources.
Disabling ULPS: Open regedit and search (Edit – Find) for EnableUlps then change the DWORD value from 1 to 0. Ignore EnableUlps_NA this does nothing. Keep searching (pressing F3) through the registry and change every entry you find in there from 1 to 0. Once finished reboot. Although disabling ULPS is not necessary I like it because with this feature off the driver does not disable the secondary card after a gaming session, which in turn allows the fans to cool the card properly instead of just shutting it down.
Editing the VGA BIOS: I used tools such at Hawaii Bios Reader, it is capable of creating a proper BIOS check sum in order to flash the card. Essentially in Hawaii Bios reader I edited the frequencies of the clocks then I proceeded to change the Fan and Temperature profiles with a Hex editor, I used HxD to do that. Be aware that if you use HxD after you use the Hawaii tool, you will need to open the hex edited file and resave it in Hawaii to it retains the right check sum for flashing. Other wise the card will not take your custom BIOS.

Leave a comment